Kevin: Today on "This Old House"... Richard: We look at a water-supply system that uses very few fittings.
Kevin: And we've taken a trip across the Hudson River to the Big Apple to visit one of the most iconic buildings in America.
Tom: And we'll install a new porch floor to last into the next century.
♪♪ ♪♪ Man: Ah, that's it.
♪♪ ♪♪ Kevin: Hey, there.
I'm Kevin O'Connor, and welcome back to "This Old House" and to our project here in Glen Ridge, New Jersey, where a lot has changed since the last time we were here.
First and foremost, the porch -- the old one?
Well, it was rotted and didn't serve us any purpose.
So, now we've got a brand-new one.
It has all been reframed.
And in a little bit, we're going to be getting some new decking put down here.
On the first floor, well, it looks pretty much the same down here because we're still in the rough framing stages.
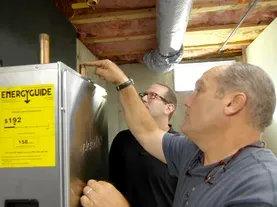
But there are signs of mechanicals going in.
Up here on the second floor, more signs of the mechanicals going in.
Here, we've got the HVAC.
So, you can see some of the ductwork has been put in already.
This is going to be hidden from a ceiling that'll be right here.
And then since last week the bathroom was framed out.
So, you can see the plumbers have done their work.
Vents, wastes, as well as supply -- so mostly PEX in this house, very little copper.
And as you come to the front of the house, you can see our new window openings, as well as the pitched roof to our porch that runs the front of the house, and then to my left, well, we've got the new framing and the roof for the bump out, and this is going to be the primary suite for Asha and Jason.
It runs from the front of the house all the way to the back.
Up here on the third floor, you now access it from this wide, straight staircase, which is a big improvement from the narrow, winding staircase that used to come up here.
And then as you step into here, this is a big living room.
Now, remember, the entire third floor, this is the primary living space for Sunita and Shankar.
So, they've got 11-foot-high ceilings.
Back here, we've got two double-hung windows to bring in a lot of natural light.
And as you come to the front of the house, this is going to be the bedroom for Sunita and Shankar -- three big windows to bring in a lot of natural light here, as well.
And you can see that these openings, well, they're completely rough-framed right here, ready for our new windows, which are starting to go in today.
And I'm told that starts down on the first floor with Zack.
Hey, Zack.
Zack: Hey, Kevin.
How's it going?
Kevin: It's going all right.
Nice progress on the house.
That third floor I think is going to be sweet.
Zack: I know.
It's looking good, right?
Kevin: Yeah.
And I promised new windows up there, as well.
So, that's what you're working on.
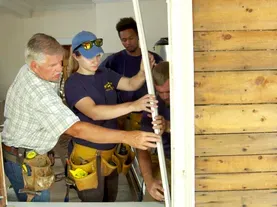
How did we get started other than rough-framing these openings to size?
Zack: So, we actually roughed them out a little bit big so we could put a cedar clapboard in there just to provide some pitch so that water can run out of the opening.
Kevin: Gotcha.
So the framing is level.
The clap actually gives it a little pitch right there.
Then you tape it down in place so it's nice and watertight.
Zack: Exactly.
And I'm just adding a couple shims here to support the window but also maintain some air space.
So, if water gets in there it can get out.
Kevin: Gotcha.
So, the windows that we have, which are wood, as you say, had to do it on the front, I guess.
Anything could be seen by the street, they wanted wood.
And homeowners just said, "Let's do the whole house in wood."
Zack: Exactly.
Make it easier for continuity.
Kevin: Okay.
So, some challenges for you working with all-wood windows?
Zack: Well, the first thing you may notice is that there's no nailing fin here.
Typically applied to the face or the side of a window, you would have a flange or a nailing fin, and that registers off of sheathing.
And then it allows you to run a piece of tape from that fin to the face of the sheathing.
But we don't have that here.
So to solve the fastening issue, we're going to shim around the window and screw through the jamb.
Kevin: Gotcha.
Zack: And to solve the air infiltration and water infiltration, we're going to use a piece of tape that's built for purpose.
So, this is meant for windows without flanges.
And basically it has a crease in it.
So, it's already released.
Kevin: Oh, yeah.
Zack: So, this is going to be applied to the outside of the jamb.
And that'll take the place of that fin that's not here.
Kevin: Looks like a top piece, side piece right here, which I'll give you a hand with.
Zack: All right, I'm going to start at the top here.
I'm going to hold it down about 5/8 of an inch.
This is pressure-activated tape.
So, I'm going to sort of use this squeegee-type tool to just push it into that freshly painted jamb.
And that's going to stick tenaciously really well to that surface.
Kevin: So, last piece of tape, meaning nothing along the bottom.
Zack: Exactly.
We want to let water escape from there.
So, we're not going to tape the bottom.
Kevin: This ready to go in?
Zack: It is.
Let's pick it up and pop it in the opening.
You can see I put those blocks on the outside already so we can just push it right into those blocks.
All right, so now that we got the window in, we know that we should have about 3/8 of space on each side.
And we do.
So now we're good to start shimming the window.
♪♪ So, let's just put a couple shims up here.
I'll tap this in and use that laser as a reference.
Let's check it for square by measuring across.
76 1/8 heavy.
So, we are good for square.
We can start screwing this window in.
♪♪ ♪♪ Next thing, I'm just gonna buzz off some of these shims.
All right, so I'm gonna peel back this one that we previously left covered.
There we go.
Put that there.
Lift it up.
Put that nice and tight, and then we can spread that out.
Kevin: But out here, when this tape is stuck, we can put our siding material right over this.
Zack: Exactly.
Kevin: Bottom sash operates just as nicely as the top.
I like it.
Nice job, Zack.
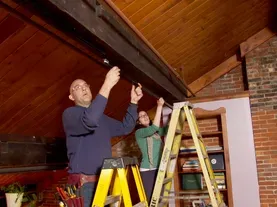
♪♪ Hey, Jason.
Jason: Hey, Kevin.
Kevin: I hear you're our sound man for this project.
Jason: Some call me that.
Kevin: What are you putting in?
Jason: Yeah, so we decided for this project, specifically for the kitchen and the living room, that we're going to do architectural speakers.
Kevin: Which is what?
Jason: All right, so an architectural speaker is a speaker that is built into the building.
Kevin: I see a couple of boxes in the ceiling already.
Is that one of these?
Jason: Yeah.
So, this is actually what's called a back box.
It has a purpose for the architectural speaker to both isolate the sound and direct it into the room.
Kevin: So, those boxes don't have, but this has got insulation in it.
Jason: Yes.
It helps improve the sound quality and also makes people happy upstairs.
Kevin: Yeah.
You're down here cooking.
You got the music on.
Babies are upstairs sleeping, all five of them.
You don't want to wake them up.
Jason: Ideally not five and ideally not awake.
Kevin: Totally your decision.
All right.
So boxes are in, insulation, then what?
Jason: So, after that we have what's called a pre-instruction bracket.
And you'll notice it's a mesh.
Kevin: This mesh here.
Jason: Yeah, so, the purpose of the mesh is so that we can align this up in the box however we want.
And we'll just screw it directly into the back box.
But the idea is that this serves as a template for the drywallers.
Kevin: So, upside down this is our finished look.
Jason: Correct.
And then what we have here is the housing for the speaker.
And you'll notice it actually has these pins in it for the speaker to connect to.
Kevin: So, you run the hard wire to the housing, you're saying.
Jason: Correct.
Kevin: Which then sits in here.
Jason: Yep.
And then you clamp it in onto this bracket.
Kevin: Gotcha.
Jason: And then the last step is the speaker itself.
And so you'll notice on the speaker it's got the pins right here.
Kevin: Oh, I got you now.
So, it's just kind of plug-and-play.
Jason: Exactly.
Yeah.
Kevin: See if I can get it in there.
Oh, yeah.
Look at that.
Jason: All right.
Now for the final touch.
You see it looks nice, but we kind of want to hide the speakers.
Kevin: And that's going to click into place.
Jason: Yep.
It's magnetically held in.
And then this can also be painted the same color of the ceiling.
Kevin: Tell me about the wiring.
Jason: This is high-end speaker wire.
I went with a 12-gauge-by-2 speaker wire.
And so this is an unshielded wire.
Kevin: Meaning what, unshielded?
Jason: So, unshielded basically means that it doesn't have any protection against EM interference and whatnot.
And the reason it's okay in this project is because we know where we're going to run it.
So, the reason why that's important is you got your electrical wire, right?
Kevin: Mm-hmm.
Jason: When things are plugged into the electrical wire, they can induce currents in other wires if they're too close.
So, if this wire is running parallel to the electrical wire, that'll create a hum or a noise in the speaker system when it's on.
Kevin: So, how do you protect against that?
Jason: One thing that is okay is running it perpendicular.
Kevin: Oh.
Jason: So, because it's not in parallel, like this, it won't induce a current when the two are crossing.
Kevin: So, unshielded crossing like this, no interference.
Jason: Not a big deal, yeah.
Kevin: Not a big deal.
Good to know.
All right.
And then the last guy here is what?
Jason: So, this is our amplifier.
This will go down into the basement, where we run all of the leads for the speakers.
Kevin: So, you're saying that this powers the speaker, whereas most speakers, or some speakers, I think, have power to them, right?
Jason: So, that's called an active speaker.
So, in our case these are passive, which means that we're running the power remotely over the wire to the speaker.
Kevin: Okay.
So, quite a bit of wiring.
Jason: Yeah.
But it's fun.
Kevin: Well, I'm glad you think so, because we like sweat equity.
And you got a lot of fun ahead of you.
Jason: Yeah, I do.
Kevin: Thanks, Jason.
Jason: Cheers.
Tom: You know what?
I think we've been working pretty hard, and we deserve a little break.
How about a trip to the big city?
Kevin: I like the way you think, Tom.
You know what?
A lot of work to do.
But train station is right up the street.
Sneak away.
They'll never know we're gone.
Tom: And you know what?
I know exactly where to go.
♪♪ Kevin: Okay, Tommy, the Big Apple I have loved this city since I was a kid.
Where are you taking us?
Tom: Let me get my bearings.
We're going to go right down here.
We got about two blocks down this way.
Follow me.
All right.
I think we're here.
And that's it -- the Empire State Building.
Kevin: Nice choice, Pop -- one of my favorite buildings in the city.
But why here?
Tom: Well, it turns out that my grand-uncle, my father's mother's brother, was one of the foremen on the steelworkers on the Empire State Building.
Kevin: When they were building it?
Tom: When they were building it.
Kevin: Why am I not surprised?
Tom: So, what I did is I arranged a tour for you and I to go see the building.
Kevin: Look at you, Pops.
Tom: Yeah.
Kevin: Nice job.
Thank you.
♪♪ Kevin: Hey.
Siobhan: Hi.
Tom: How are you, Siobhan?
Siobhan: Nice to meet you.
Tom: Thank you for setting this up.
Kevin: Nice to meet you.
Pleasure.
Siobhan: Welcome to the Empire State Building.
Kevin: Thank you.
Tom: It's nice to be here.
Siobhan: Have you ever visited before?
Tom: I was here once in the '80s, but it was too late in the day.
I got as far as here and asked about tours, and they said, "Too late in the day for tours."
Siobhan: Well, we are going to make up for that today.
I'm going to show you the entire building, including how it was constructed.
And we've had a lot of changes since the '80s.
So, I'm going to take you upstairs to the exhibit and show you how the building was built.
Tom: Great.
Well, I'm excited.
Kevin: Let's do it.
Siobhan: Follow me.
So, this is the original Art Deco lobby.
And even though they had made changes in the '60s, most of what we're seeing, over 90%, are still the original materials.
So, guys, welcome to the construction exhibit.
Kevin: So, these images that you've got up on the wall here, I mean, they really help to bring you back to the '30s and what was going on.
Look at these guys, just walking around on the deck, sitting on the beams right there.
No harnesses, no hardhats, no nothing -- it's unbelievable.
Tom: It's crazy.
Siobhan: That's definitely the coolest part of the exhibit is to really visually see how these men worked and what the conditions were day in and day out.
And actually right behind me we see one of the rivet gangs hard at work.
So, you see the heater over here heating up that rivet in the coal pot and then tossing it over to the catcher and handing it over to the welders.
Tom: My Uncle Manuel used to say there was a coal bucket that they would pump up the flame, heat up the rivet, and throw it, and the guy would catch it in some kind of a hopper, and then they would bang it in.
Siobhan: So, your uncle worked on the Empire State Building?
Tom: Yeah.
Siobhan: Oh, that is so cool.
Tom: He was a steelworker, I believe.
Kevin: This guy back here, Tommy, he's actually short, throwing rivets.
That might be him.
Tom: Yeah.
Okay, Sonny.
Kevin: [ Laughs ] Siobhan: So.
also here in the exhibit, you'll notice this steel beam.
This is actually one of our structural support columns.
And you'll notice that it's seven layers of steel.
And, most notably, you could see all of the rivets.
Tom: So, that steel column goes all the way up to the top of the building.
Siobhan: Yes, that is one of 12 support columns that go all the way through.
Kevin: So, what are the materials?
I mean, the steel was the frame.
But then, you know, what are the floors, the decking made out of?
Siobhan: So, yes, once they had all this steel in place, which is the frame and support of the building, then all of the masonry workers would come in and actually pour cement.
So, it's steel, cement, limestone, and brick.
Tom: I heard it was like 730 tons of brick.
Siobhan: That is correct.
The building in total weighs 365,000 tons.
Tom: Wow!
Kevin: My gosh.
It's staggering to think how quickly it went up.
Siobhan: In under a year.
They broke ground here on March 17th of 1930, and we opened to the public May 1st, 1931.
Tom: And they finished 12 days early, if I remember correctly.
Siobhan: That is correct -- and under budget.
And that's something you'll never see today.
Tom: No, that's tough to do.
♪♪ Kevin: Oh, yeah.
Siobhan: So here we are, gentlemen, at the 102nd floor, 1,250 feet up in the air.
Kevin: Look at those views, huh?
Tom: Amazing.
Siobhan: So, up here, not only do we get to see this amazing view of the city, but you also get to see some of the upgraded changes we made here.
Kevin: What kind of stuff did you guys do?
Siobhan: We modernized all the elevators, so they're actually producing energy as they're running.
Kevin: Really?
Siobhan: We repaned all of our windows, 6,500 windows in total.
Tom: And I think I read it was 6,514 windows.
Siobhan: Yes.
If you want the exact number, that would be correct.
Kevin: What were you doing last night?
Tom: I was excited about this.
Kevin: I can tell.
Tom: What I want to know is, where are the binoculars?
Kevin: Oh, yeah.
Siobhan: Those are actually downstairs on our world-famous outdoor observatory down on the 86th floor.
You guys want to go check that out?
Tom: Oh, yeah.
Siobhan: Let's go.
So, here we are, guys, on our world-famous outdoor observation deck.
We get about 4 million visitors a year that come here.
Kevin: Wow!
Tom: Wow!
Kevin: Okay, a lot of people.
Tom: It's amazing.
Siobhan: And this is where I am going to leave you to enjoy the view.
Do you have any final questions for me before I part with you?
Kevin: Just a big thank-you.
Siobhan: Thank you, guys.
Kevin: Really appreciate the tour.
Siobhan: You're welcome back anytime.
Tom: You were fantastic.
Siobhan: Thank you.
Tom: Where's the binoculars?
Siobhan: Right outside on the deck there.
Kevin: Thank you.
Tom: Thank you, Siobhan.
Kevin: Tommy, I got some facts of my own.
Tom: You do?
Kevin: Well, Siobhan whispered me a couple.
Tom: Oh, okay.
Kevin: She said that you can actually see six states from the observation deck -- so, obviously, New York, but you can see Connecticut, Pennsylvania, Delaware, all the way up to Massachusetts, and then obviously across the river to new Jersey.
Tom: This is the Hudson, and New Jersey's right that way.
And I think that we can see the project.
Kevin: Our project?
Tom: Yeah.
Richard: This is the highest point in Glen Ridge, New Jersey.
Jenn: It is pretty spectacular.
Look at all those old-growth trees.
Richard: Spectacular.
And about 16 miles away due east is downtown Manhattan.
And right there in the center you can see the Empire State Building.
Tom: There's Richard and Jenn.
Kevin: Cut it out.
For real?
Tom: Yeah, I'm not kidding.
Richard: I see Kevin... Jenn: What?!
Richard: ...and Tommy.
Jenn: Give me those.
Kevin: Oh, my God, we've been spotted!
Richard: Hey!
Jenn: Aren't they supposed to be on the jobsite?
Tom: They're actually waving.
I'll wave back.
Kevin: Gosh, you're right.
They are.
We're busted.
Jenn: [ Sighs ] Richard: They didn't tell you?
Jenn: They didn't tell me.
Tom: Yeah, well, you know what?
I think that's our cue that we got to get back to the jobsite and see what's going on.
Kevin: All right, back to the train.
The dimensions of the new front porch are identical to the old.
The historic commission made us do that.
So, about 8 feet deep, almost 42 feet long.
And, Zack, fun, little fact that you probably didn't know, but Tommy's second uncle twice removed, Petey, built the entire Empire State Building by himself.
Tom: Uncle Manuel.
Kevin: Right.
Sorry.
Tom: Geez.
Zack: All right.
Tom: And 12 days ahead of schedule, I might add.
Kevin: Yeah.
These Silva's work fast.
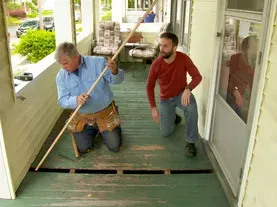
Speaking of working fast, framing is in for the new deck.
I love it.
What's going down?
Zack: Yeah.
So, we're going to use this porch-floor product.
It's actually tongue-and-groove.
Basically, this is sold in two dimensions.
It's sold in 16-foot lengths and 8-foot lengths.
And because of the Historic Preservation Commission in this town, we needed to build this porch in the same location, same dimensions.
But this is slightly over 8 feet deep, so we would have been a little bit short if we cut 16-footers in half.
So, what we're going to do is run one of these boards parallel to the house, and then we will run our 8-footers that are 16s cut in half, into those, and then we're only going to cut off about half an inch.
So, we're going to utilize material well.
Kevin: So, we get the boards going in the right direction, which is nice.
We save the homeowners a bunch of money, which is nice.
And, Tommy, what do you think of the product?
Because this is synthetic.
It's not original wood.
Tom: I like the composite.
Historical liked it.
I think the homeowners are going to love it over time because it's easy to maintain.
Don't have to stain it.
But so, as Zack said, we're going to take the piece, and we're going to run it against the house on a straight line, and we're going to take and put a groove on the pieces that are run into it.
So they'll butt in like that and that will lock them into place.
Kevin: All right.
Well, somewhere Uncle Manuel is saying, "Get to work."
Tom: Yeah, absolutely I agree.
All right.
So, I'm going to measure from the outside back, hold the board gently against the house.
I've got 91 1/8.
Zack: I got 91 1/8.
Tom: Well, there you go.
All right.
So, put a mark and snap a line.
Zack: Snap right.
Tom: There it is.
Now snap the other side.
Zack: Snap left.
Tom: All right.
So, now we have our line to lay our board right on here, just like that.
We hold it straight on the line, and we'll screw it down to the face.
But now we have this board running parallel to the house.
Now let's take the board off and look.
See what we have?
We have our flashing that comes down from the house and runs out to allow the water to run out.
The problem is, is when we put the board on there, the flat side of the underside of the board will not allow the water to drain out.
It'll puddle in there.
So, what I did is I took the board, and if you look on the board, I put a series of curved cuts about an eighth of an inch deep all the way down the board.
So, when the rainwater comes down and gets in behind the board on top of the flashing, it still can weep out all those little grooves.
Zack: All right.
Tom: So, we put it in.
I have to allow for my overhang, 2 1/4 right here, and we're going to screw down through the face and we'll plug those holes afterwards.
Now, this corner comes together perfect.
And we're going to screw down through the face.
Look at this miter right here, how nice it is.
And it's actually a tongue-and-groove joint.
So, it doesn't twist or pull out of there.
All right, Now that our first board is in, we can start laying the other ones up against it.
Kevin: So, I got to say this surprises me, a flooring and nailer and not face screws for an exterior deck.
What's up with that?
Zack: You can actually use stainless-steel screws, but we're going to use floor nails.
They're stainless steel and approved by the manufacturer.
Kevin: No kidding?
Zack: We're going to move a lot faster.
♪♪ Richard: Well, we are well under way with our rough plumbing, waste and water.
And on the water, we're going to do something a little bit different on this project.
Historically, whenever we run water, it has always been a trunk-and-branch system.
Main water supply here, big pipe, and as each tee comes to a branch, it can get smaller and smaller as you go into the building.
But there was a trend when PEX first came out to do a home-run system.
There would be manifolds like this with separate supplies for cold and hot, and run a home run for each fixture or fixture group through the building.
This would be mounted down in the basement, much like an electrician's circuit panel.
Plenty of advantages -- there was some disadvantages.
There was a fair amount of pipe running to each one, and on the hot-water side you had to empty out a really long pipe to get instantaneous hot water upstairs.
So, what we're going to do is actually an interesting hybrid of these two systems.
Kordian Rak is our plumber on this job.
Glad to have you aboard.
You're a good one.
So, we're not going to have a central manifold.
Kordian: We're not.
What we're going to be doing here is we're going to be using this three-quarter pipe, and we're going to be using these multiport tees.
And what we have is depending on if you have 3, 2, or 4, you have the main supply coming in connecting to this multiport tee.
And it has a short run going to each fixture.
Richard: Now, that's different than the way we historically have done it.
Whether it be copper or with PEX, whether or not it was a home-run system or trunk and branch, it was always you come up and then there was elbows and tees, and if you start adding them up at every bathroom, there was, what, 15 or 20 fittings?
In this case we're going to have far fewer fittings, right?
Kordian: Correct.
We're going to have far fewer fittings, a lot less points of leakage and shorter runs from the hot line.
So, it's quicker hot water.
Richard: Right.
And you can continue on with the supply from one bathroom onto the next one, right?
Right through those multiports.
Kordian: Correct.
With one of these flow-through tees here, you can start from this end, feed a bathroom group, and continue to another one.
So, Rich, this is what it looks like installed.
Instead of having 20 pipes coming in, we've only got these two lines coming in here and feeding all of these bathrooms.
Richard: Three bathrooms -- one here and two upstairs.
Kordian: Correct.
Now, as you can see, there's all these bend supports installed here.
There's no fittings.
It comes all the way to here, where we have these multiport tees.
Richard: Okay, so come to here.
There's the tees right here.
So, hot and cold right there.
Kordian: And I've only got about 7 to 8 connections here.
And then, if you follow this line further, it continues down to the next bathroom group.
I've only got about 7 to 8 connections also there instead of your typical 30 to 40 connections.
Richard: Right.
So, you've got half the connections, you got better water supply, and you got the ability to add that recirc line.
So, everybody gets instantaneous hot water.
That's pretty good.
You're a genius!
Kevin: Next batch coming in right here.
Tom: Right.
Kevin: It's a good look, but I got to say I'm most impressed with how quickly it goes with the floor nailer.
Tom: I told you it was going to save a lot of time.
Kevin: That's good.
I like it.
All right, so, Zack, what do we got coming up next time?
Zack: Next time, I think we'll have the membrane on the outside of the house.
Windows will be in, and we'll be working on the exterior trim.
Kevin: I like it -- a lot more progress here in Glen Ridge.
So, until then I'm Kevin O'Connor.
Zack: I'm Zack Dettmore.
Tom: And I'm Tom Silva.
Kevin: For "This old House."
Kevin: Next time on "This Old House"... You might think that siding is the only thing that keeps your house dry, but there's actually a layer behind it that does that job even better.
And today we'll learn all about it.
Oh, yeah, look at that.
Tom: And before we started installing the roofing, we had to make sure that this drip edge didn't hide the detail of this molding.
Kevin: Then I'll take a trip to a local stained-glass studio, where they're building a window our homeowner designed.
That's next time.