Kevin: Today on "This Old House"... Richard: We'll show you a unique and effective way to keep pipes from freezing when you have to run them in the outside wall.
Tom: Imagine installing new windows in an old wall without any headers.
We'll show you how.
Kevin: And we'll find out what the homeowners are thinking for exterior colors and why they have to choose so early.
♪♪ ♪♪ Man: Ahh.
That's it.
♪♪ ♪♪ ♪♪ Kevin: Hey there.
I'm Kevin O'Connor, and welcome back to "This Old House" and to our project here in Glen Ridge, new Jersey, where we are transforming this 1887 Victorian into a multi-generational home.
Now, our homeowners, Sunita and Shankar, have lived here for over 25 years, and they are going to stay, but they're going to be joined by their daughter Asha and her husband Jason, and they're each going to have their separate living spaces.
So Asha and Jason will be up here on the second floor.
They're going to have a new primary suite and office over here on this side that's been recently framed out.
And then Sunita and Shankar will be up on the third floor.
And that first floor right there, that's going to be shared living space.
Hey, Zack.
Good to see you.
Zack: Hey, Kevin.
Welcome back to Jersey.
Kevin: Good to be in Jersey.
So nice progress.
Every time we come, something else has been finished.
You got the two-story addition all framed out.
Zack: Coming along nicely.
Kevin: Looks like you're getting ready to rebuild the front porch, too.
Zack: Yeah, we're pretty much ready to frame on top of these right now.
Kevin: Where are my concrete posts, brother?
Zack: Well, this is what we had.
We had this old pier.
Right?
Kevin: So what was that?
Just a pile of concrete with brick on top?
Zack: Exactly.
We had seven of these.
What you would normally see is a hole dug in the earth at least 36 inches deep.
We'd fill it with concrete, and we'd need to get the hole inspected.
And we need to let that concrete cure.
Could take a week or more.
So we went with these helical piers, which pretty much go in in the morning, and we're able to frame on them right away.
Kevin: So we've actually used these before and actually in Jersey of all places.
Let me just pull off this sleeve to get a better sense of this thing.
Zack: Maybe it's a Jersey thing.
Kevin: [ Laughs ] Well, they were really good after Superstorm Sandy.
So, big metal pile, screw on the end, and tell me the process for getting this installed.
Zack: Basically, they come with a machine that drives them into the ground.
It can kind of control the angle, and once it senses enough hydraulic pressure, it stops.
And that's how you've reached adequate weight bearing.
And if you don't reach that with this seven-foot post, you can always add pieces on and just keep going down.
Kevin: Okay.
And so if he reaches the right depth here and it's two feet above ground and here it's one foot above ground, what then?
Zack: All we do is cut it off with a band saw.
Kevin: And on top of that, he gives you a bracket.
So we're pre-drilled here so you can screw a nail through right into your framing.
Zack: Exactly.
And I've driven some screws through the post into this bracket, and then we can frame on top of it.
Kevin: So I get the idea that they go in quickly.
There's no concrete to set up.
So that speeds things up.
Where is the inspector?
Because he can still take a week or so to come out.
Does he not have to do that?
Zack: He doesn't have to do that with this because the company who puts these in the ground supplies the engineering for them, and they give the building inspector a report that says that these will hold 5,000 pounds each.
Kevin: You hire a certified guy, he provides a certification.
That's good enough for the inspector?
Zack: It's an all-in-one service.
Kevin: So this went in this morning.
You're ready to build today?
Zack: Exactly.
Kevin: Cool.
Alright.
Well, I know I'm going to see you upstairs in a few, but first I'm going to go check in with Kalen downstairs.
Zack: Alright.
See you in a bit.
Kevin: Alright.
Big changes in here now that everything is opened up.
Let me give you a lay of the land.
So you may recall that this was the front entryway, a bit cramped.
We had a big fireplace there, a closet back there, the stairs actually wrapped around.
Opportunity to change all of that.
Chimney is gone and now the stairs are a straight shot up to the second floor.
In here we've got the dining room.
Hey, Carter.
So, it used to be a dining room.
Will remain a dining room, but now we've got one big, wide-open space front to back.
Check out what Zack did here.
He actually insulated the crawl space.
Closed cell foam so we get R value but also a vapor barrier.
Dining room opens up into a new kitchen.
We've got glass on one wall, glass on another wall.
And as you come through here, through the back door, a back entryway, and in here a full bath.
Because remember, Sunita and Shankar on the third floor have the option of moving down here to the first floor.
So a shower down here is important.
Over here we've got the old double parlor that ran front to back.
Now it's two rooms.
We've got a family room here.
Library up front.
But check this out.
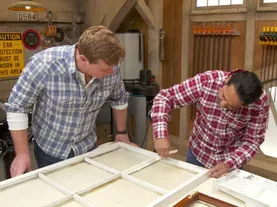
Doors and windows on site.
Almost 50 openings in this house.
Kalen, how are you, man?
Kalen: Doing pretty good.
How are you?
Kevin: I'm doing alright.
So what did our homeowners pick for a window?
Kalen: We got wooden windows going in.
Kevin: Wood on the inside and the outside?
Kalen: Interior, exterior both.
Kevin: Really?
Bold.
Why did they do that?
Kalen: We're actually required to.
This is a historic area, so we have to have a wood window on the street-facing side.
Kevin: So they have to be here, and then they just decided to go with the same window for the entire house.
Kalen: Yeah.
It made it easy for us and did the whole thing.
Kevin: Okay.
So you're just jumping on this right away, huh?
Kalen: Yeah.
Yeah.
I got to do this very quickly because I only have 14 days from the time that I received these windows to get them painted, or else the warranty is voided.
Kevin: Seriously?
Kalen: Seriously.
Kevin: So from the day they arrive, two weeks, you got to have them painted.
Otherwise warranty is voided?
Kalen: Voided.
Kevin: Wow.
They really want you to protect this wood.
Kalen: Yeah, yeah.
And even though they're on the job site, we keep them protected -- we have them staged off somewhere else -- they are still subject to swelling, expansion, contraction from the moisture.
So we want to get these sealed as fast as possible.
Kevin: Okay.
So come see you primed, I presume.
And you're prepping for top coat of paint?
Kalen: Yeah, yeah, I'm just going to take some tape, cover up these gaskets.
And then I'm also going to take a liquid-applied mask, and I'm going to put it on the glass from the edge to the film.
Kevin: So you like doing the prep work tabletop and then what, spray them outside?
Kalen: Yeah, yeah, we'll probably either come up with a booth either in here or outside, but as far as prep work, this is going to be a lot easier for me.
I can pay attention to the detail.
I enjoy working at a gentleman's height when I can, so.
Kevin: [ Laughs ] I love it.
Alright, well, listen.
Hey.
Clock's ticking.
Kalen: Yeah, I know, I gotta go.
Kevin: Thanks, man.
♪♪ As I mentioned, this second floor is for Asha and Jason.
Sunita and Shankar will be up there on the third floor.
So here we're going to have an office up front and then a primary suite back along here.
Over my right shoulder, we're going to have a bathroom and then two bedrooms back here for a growing family.
And you may recall that the second floor, all the joists and all the sheathing was taken out.
You guys have completely redone that, Zack, but you didn't do that with the third floor.
Zack: Yeah, we're actually going to leave the third floor.
It's pretty salvageable and there's not as much complexity and damage like there was on the first floor and the second floor.
And we're also trying to work within the client's budget.
So being able to salvage all this lumber and make this floor work is going to save us a good bit of money, and we think we can make this pretty good.
Kevin: I'll tell you, it's a big, wide-open space.
I'm kind of surprised that three temporary posts are supporting everything up there on the third floor, Tommy.
Tom: Well, there's not a lot of weight there, Kevin.
It's basically the joist that rests on the two outside walls.
It's basically sagged a little.
We want it to just be flat and straight, not level like the floor, but straight.
We've taken a couple of measurements already, and I think it's a little over an inch difference.
Now, that's so little that you will never notice that it's out of level.
The key is you will notice if the floor undulates and we want them to straighten that out.
Kevin: Okay.
Tom: Starts with the string line.
So we've already got that one fastened up there.
So let's get it down the other end here, Zack, and make it nice and tight.
Zack: Alright.
Tom: So what we've done here is we've placed the nail on this side of the wall, and we've placed it an inch and a half down from the underside of the double plate.
We've done the same thing on the other end, inch and a half down.
Then we can take a look at the string line.
[ Chuckles ] You can see that the double plates up here really has a dip in it down there.
So that means that that section has to get lifted.
So Zack's going to jack that up.
And we'll show you how it goes up in relationship to the string line.
You can see how high the string line is now.
Kevin: I mean, that line basically should be an inch and a half below that top plate?
Tom: Exactly.
Starting to go up now.
Zack: Alright.
Tom: We got about another inch to go.
[ Clanking ] A little more.
Alright.
Right there.
Okay.
So now this string line is the same distance between the bottom of this top plate to the string line on this right here.
The same down that end and the same down that end.
But the distance from the underside of the plate and the top of the shoe is different because the floor upstairs is crooked.
It's pitched down and the second floor is level.
So now what we want to do is take a measurement on each end.
And I want to transfer that measurement to my pile of studs over here.
Kevin: 98 5/16.
Tom: Okay, 98 5/16.
Make it heavy, Zack.
What have you got?
Zack: 99 5/16.
Tom: 99 5/16.
Alright.
So now we want to make sure that the bottom of all the studs are actually even.
So we have a straight edge there.
Makes them nice and tight.
And they're also square.
I'll check them with the square.
Alright.
So those are good there.
Tom: Alright.
So the next thing we're going to do is we're going to take and we're going to take a measurement that you have the measurement there -- 98.
I'm going to do 99.
And we're going to measure on the same edge.
You're going to measure on the far edge closest to you.
And I'm going to measure on the far edge away from me.
So 99 5/16 here.
99 5/16 right here.
Kevin: ...5/16 right there.
Tom: Okay.
So now I'm going to take the level again.
And we're going to connect the dots on each side.
Just mark it on the same edge.
Now, because each stud is a different length, we want to number them.
We want to make sure they stay in order, and then Zack can cut those off and we can start putting them in.
♪♪ And our studs are marked 16 on center all the way down the wall.
And same thing on the plate above.
♪♪ ♪♪ Kevin: Look at that.
That is a big improvement.
Nice.
Tom: Huge.
All we got to do is cut the jack studs.
We're under the beams.
Kevin: Alright, well, if you guys can handle that, I've actually got some exterior paint colors to look into, so I'll leave you to it.
Zack: Enjoy.
Tom: Alright.
Kevin: Because those windows have to be painted, that forces us into color decisions.
Hey, Asha.
Hey, Sunita.
Asha: Kevin.
Kevin: So the windows have to be painted, which means you got to pick a color for that, which is your trim color, which gets you to the body color and everything else.
So your back is up against the wall, but it looks like you're working on it.
Sunita: We are.
Kevin: Where did you start?
Sunita: We actually started with the pavers and the shingles.
Kevin: Okay.
Sunita: These pavers are -- Actually we selected this light gray.
That'll be on the sidewalk coming up towards our house.
Kevin: So out front, one of the first things you'll see is this.
Sunita: One of the first things.
And we thought this was nice and light, very welcoming.
Kevin: It's a distinctive color for pavers.
Sunita: Yeah.
So we started with that.
Kevin: And then you said the shingles?
Sunita: Shingles.
Kevin: You've got the asphalt one right here.
Sunita: So we actually really liked this light pewter gray shingles because we thought it would complement the gray pavers.
And we thought this gave us a lot of options by going with the lighter gray.
Kevin: So down on the ground, up on the roof, you've got it bracketed.
And once you had those two picked, you were to what?
Sunita: We went to the trim, which was really important because the windows needed to be painted.
Kevin: Exactly.
Sunita: We originally selected a white.
Kevin: Yeah?
Sunita: And then we realized it wasn't historically accurate.
So we went with this white that has just a little bit of yellow undertone.
It's more historically accurate.
Kevin: Yeah.
The white whites were hard to get way back when.
So I can see why they would say that the white white isn't historically accurate.
So something creamier is what you're thinking there.
Sunita: Yes.
But we couldn't pick anything darker, otherwise the manufacturer, you know, it was important for the warranty.
Kevin: Right.
So this is PVC trim, not wood.
Sunita: Yes.
Kevin: And we have learned it expands and contracts a lot over the length.
And so heat causes it to do it even more so.
So dark trim, going to heat up, move a lot.
Manufacturer doesn't want it moving.
Sunita: So that's why we were really happy with this little bit white with a little bit of yellow in it.
Kevin: So that leaves us down to the body color.
All of this is going away, but you are replacing it with shingles which is shown here.
And you're getting a diamond pattern even though we didn't find it originally.
Sunita: Yes.
Kevin: It's going to fit with the house.
Looks like you've narrowed it down to three from how many?
Asha: So we were actually looking at about 100 colors in the green and blue color family.
Kevin: You've laid out three names -- cascade, contented, sea salt, darker to light.
Asha: Right.
They have a little bit more gray in them, a little more toned down.
At the same time, our first pick, cascade green, is still a little bit too bright.
Kevin: So this is definitively out.
Okay.
Down to two.
Asha: So now we have contented and sea salt.
We like sea salt, but it has a little bit of a blue undertone.
And we think we want to land more in the green color family.
And we do like contented a lot.
It's a nice neutral green.
So I think that's our happy compromise.
Kevin: Is it?
Sunita: I like it.
Kevin: So you guys are in agreement.
Sunita: Yes, we are.
Asha: Yeah.
Kevin: That's good.
Alright.
So from 100 to 1.
Sunita: Yes.
Kevin: And we've got the trim and the roof and the pavers, so that's nice.
So it won't happen for a while but it's a decision that had to be made.
So thank you for doing that.
Appreciate it.
We'll keep moving on.
Sunita: Thank you.
Kevin: Alright.
Thank you, guys.
♪♪ Richard: So the rough in has begun for our HVAC and plumbing on this building.
And this house is going to end up with two cold-weather inverter heat pumps.
Now, this system will be able to find heat even on the coldest day -- and that can be as low as zero degrees here in New Jersey -- and still heat the building and enough power to cool the building on the hottest day.
So you can see the ductwork has begun for this first-floor system.
There will be registers upfeeding it.
You can see one here.
The ductwork is run here.
And there'll be another system on the top floor feeding down.
Now, it's always a bit of a land grab on these buildings when you're first trying to lay out the system because the HVAC guys want to take the best real estate because the ductwork is larger.
But there are times you have to have an arbiter to make sure that the plumber gets his space and the HVAC gets their space, and that's when a good general contractor comes in.
And that's you.
Zack: That's me, I guess.
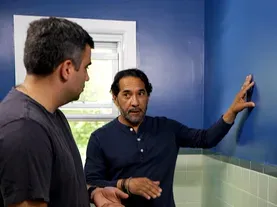
Richard: And cold weather can also freeze pipes.
Right?
Zack: It can.
We got an interesting situation here.
You already saw the crawl space there, but starting right here, we're on an old slab from a previous edition.
Richard: I remember all you did to make this thing tight.
Yes.
Zack: Exactly.
So, from the old basement, we've got the water pipes coming through that conditioned basement, up through this plate into this cavity here, and we bring it all the way above that slab to this sink, which is dead center.
Richard: And it's always the way.
They always want the kitchen sink to be looking out the window around the outside wall, typically.
Typically you just come down through the slab, always in a safe place.
But not so here.
So what you've done here is actually you've almost built a foam trough that goes right around that and keeps these pipes in the building.
Zack: Exactly.
We're trying to isolate these pipes from the cold weather.
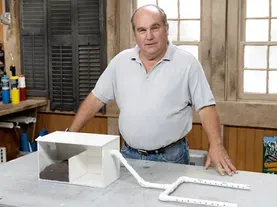
Let me show you this cutaway.
So if you look right here, you can see how basically this is the inside of our house.
Richard: Right.
Zack: And if you follow the interior of the rigid foam, we brought the inside of the house out and back in again.
So we basically encompassed these pipes within the building cavity.
And if you compare that to a traditional assembly where we have the insulation around the pipes, these aren't in effect inside the house.
They're not outside the house.
Richard: They're almost locked away from any heat inside the building.
Zack: Exactly.
Richard: I'll tell you, not a lot of people do it this way, but I love it, particularly in cold weather.
You know, we're often called into these buildings that don't do what you did.
Zack: Right.
Richard: And the pipes are frozen and we walk in and we see that the kitchen cabinets have been left open all winter with a heater under there.
And the effect of what they've done is put a little bit of foam insulation on the pipe or some of this bubble stuff, but it's still no match for the cold weather.
Zack: Yeah, that's not enough effectiveness to stop the cold air drafts from getting into this cavity.
Richard: This will be great.
Homeowners are going to be so happy when they can have hot and cold water in the winter.
Great job.
I love it.
I love your cutaway.
Zack: Oh, thank you so much.
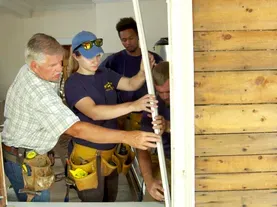
♪♪ Kevin: Hey, Tommy.
Hey, Jason.
Both: Hey, Kevin.
Kevin: So, we got some windows going in?
Jason: Yes, sir.
Two new construction wood windows.
Kevin: Two of those over here?
Jason: Yep.
Two windows in this wall.
Kevin: What's your plan of attack?
Jason: What we're going to do is we're going to add a double king stud on either side of our openings and a triple mullion stud in the center.
Make our cuts, remove whatever unneeded structure we have left.
Kevin: Triple in the center because you're saying those are not going to be molded together.
Jason: They are not.
They're two separate windows.
Tom: And the nice thing about this wall, if you look up top, when this wall was framed, it was framed with a 4x6 beam.
And that is actually called a drop girder.
It's going to carry a lot of weight.
Kevin: Okay.
Tom: And this is a gable end.
Gable end means that above this wall and above that beam are rafters that run up here, up here.
And it's a triangle that's pushing down.
So all of the weight of the wall is distributed equally over that beam.
Kevin: So essentially rafters are taking the roof weight and put it mostly to that wall, to that wall and less to this one.
Tom: Right.
Because of that, this is more than sufficient to carry the weight that's needed for the opening of those windows.
Kevin: Meaning we don't need to add a header specifically for those windows.
Tom: Nope, but that plate there, now, because it's carrying an opening, it becomes the header for the window.
Kevin: Gotcha.
Okay.
So how do you want to get started?
Jason: We have a bunch of studs cut already.
So we'll just grab them, get them in place, and then we'll get this wall opened up.
♪♪ ♪♪ We set this laser level up to reference the window heights from the new addition.
We'll measure down for our sill height, and then we can cut our opening through to the outside.
♪♪ ♪♪ ♪♪ ♪♪ Kevin: Look at that, huh?
Jason: Nice.
Kevin: Boy, that is a... some nice views from the new laundry room.
Jason: Absolutely.
Tom: Now we have a little more prep work to do outside, like remove the shingles, tighten up the sheathing, and we're in business.
Jason: That's it.
Kevin: Thanks, Jay.
Nice working with you.
Jason: Absolutely.
Thanks for the help, guys.
Tom: Alright.
♪♪ Tom: Hey, Zack.
What are you doing in here?
Zack: I'm just laying out everything for the plumbers and electrician.
Tom: So you got your plumbing for your toilet, a double sink.
You got lights on the walls and switches.
What's this all about?
Zack: Well, we find that a lot of things change between the time when the plumber, for example, bids a job and when they come to actually do the work.
The specifications change.
So we find making everything absolutely foolproof and taking the time to lay it out for them minimizes errors.
These electrical signs are more helpful for the homeowners because a lot of times the homeowners can't read plans, right, so they don't actually understand what is written out on the plan.
So putting these signs here allow them to know there's a recessed light switch here, there's a sconce, and there's a vent fan here.
And we've even written on the sides whether they're dimmers or timers.
Tom: So you get it all right there.
No questions.
But I'm looking at this bathroom and I see that one light there.
Doesn't seem like a lot of light in this bathroom.
Zack: Which is exactly why we're doing this walkthrough with the homeowners.
It'll give them an option to just add another sign there.
The electrician can do that, versus if he had all of his boxes up, that would be a change order and they'd be coming back out again.
Tom: Yeah, it's perfect because the homeowners see something on a plan -- they don't understand until they actually see it.
And they say, "Oh, that's not enough light."
Zack: Exactly.
You know it, but they don't know it.
Tom: So you got your tub laid out here and you got your shower laid out here and the controls for the shower right here.
Look at this.
Right on the stud.
Zack: So that's exactly why we do this, right?
We can remove that now while the framers are still framing.
And when the plumbers show up, they get to do what they do best, which is just plumbing.
Tom: Yeah.
You don't want them drilling a hole in this.
You move it for them and they save some time.
Zack: Exactly.
Everyone's happy.
Let me show you this.
This is the best part of the whole system here.
Tom: Alright.
Zack: So we've got these QR codes mounted inside every doorway.
And that actually brings up all the specifications, elevations, specs on, you know, vanity, tub filler, all those items.
And the cool thing about it is it's updated in real time from the office, so we're not chasing updated plans or working off of old, outdated ones.
Tom: So any sub that has a phone, he can take a picture of it and he knows exactly what he's going to do that's already been changed.
Zack: Exactly.
Tom: Well, I got to say that's great for them, but it's got to be -- added a lot of work for you.
Zack: It does take a ton of time.
Tom: Yeah.
Zack: But I think it's much easier than having to make those changes after the fact when we've already tiled the wall.
Tom: Oh, perfect.
Kevin: You building a house with a tablet again there, Zack?
What's going on?
Tom: He's very organized.
He's got the system down where it tells him exactly where everything is.
All the changes are made.
Kevin: Doesn't surprise me.
Have you seen the other organization going on in this house like the truck?
Good heavens.
Richard: So what have we got next time?
Zack: Next time, we're probably gonna be putting in some windows and we'll have electrical and plumbing well underway.
Kevin: Good.
Alright, well, we like well underway.
So until next time, I'm Kevin O'Connor.
Zack: I'm Zack Dettmore.
Tom: I'm Tom Silva.
Richard: I'm Rich Trethewey.
Kevin: For "This Old House" here in Glen Ridge, New Jersey.
Richard: So wait a minute.
Where's the tub go?
Is that right there?
[ Laughter ] Kevin: Next time on "This Old House"... Richard: We'll look at a water supply system that uses very few fittings.
Kevin: And we've taken a trip across the Hudson River to the Big Apple to visit one of the most iconic buildings in America.
Woman: Welcome to the Empire State Building.
Kevin: Thank you.
Tom: Nice to be here.
Kevin: You can actually see six states from the observation decks.
Tom: And we'll install a new porch floor to last into the next century.
♪♪