♪♪ Kevin: On "Ask This Old House," our experts travel across the country to answer questions about your house.
♪♪ Today, Richard shares the marvel that is modern plumbing.
Then he helps a homeowner retrofit radiant floor heating... Richard: Go.
Kevin: ...underneath his existing bathroom floor.
Plus, Nathan tells us everything we need to know about maintaining and updating cable railing systems.
And Jenn walks us through the new changes to the USDA Hardiness Zone Map.
Next, on "Ask This Old House."
Richard: One of the things that people don't even notice is modern plumbing.
They expect to have perfectly clean water.
They expect to flush or run the water in the sink, and it just goes away.
And it's one of the great luxuries and necessities of the world that is underappreciated.
Woman: That's really good.
Richard: Perfecto.
Life is just...really awful if you can't trust that you're not gonna get sick from that.
The simplest little bug can contaminate the population.
It's just more important than people ever think about in their day-to-day life.
It's much more important.
They just sort of think, "Oh, yeah, let me just have a glass of water."
Nowadays, you just -- you can walk into a commercial bathroom and just swipe your hand, and it gives you clean water.
Shut it off.
The toilets do the same thing.
My grandfather -- My great-grandfather would flip around in his grave three times to think about that kind of stuff.
[ Toilet flushes ] The term "loo" is derived from the French for regardez l'eau.
Regardez l'eau is "watch out for the water."
And so it would be that there would be a chamber pot that was used on the second or third floor and was thrown out the window, and they would yell, "Regardez l'eau!"
And regardez l'eau!
was shortened, at least in England, to loo.
The way they disposed of it in the castle era was they built a moat, and the moat was filled with the unmentionables.
The real need for modern plumbing came when we went from an agri-based society to a city.
And they moved to a city, and now there's all those people and they have to dispose of their waste.
Most of the rivers that the cities were developed around were soiled and stuff like that, so it became critical to have a modern sewage-treatment plant or some sort of way to get that stuff to safety and then get it treated.
Man: So, this is the clean water that we're gonna be sending out to the Merrimack.
Richard: Let's see how you did, my friend.
Man: Well... Richard: I'm not sure I'm thirsty, but that looks pretty good.
Those fish are gonna be happy.
Cities could not be developed at all without proper plumbing.
Just can't.
You could define the "modern era" of plumbing is really when they industrialized and made pipes.
You know, so it would have been -- At least in the United States, it was 1890, 1900 is when it really became that you could mass-produce piping.
The plumber was bringing this new thing that was never heard -- thought of before.
They bring [gasps] water in the building and [gasps] you could make hot water and [gasps] oh, you can make the waste go away.
When they delivered water, it was just like, "Wow!
You know, think about the magic that would have been if you used to have to go to a well and go like this and bring it in and then heat it up on a coal stove in the kitchen.
Like, this made this house change.
And so that's sort of a fun sort of pride point for me is that we make houses livable.
We make life livable.
If you don't have clean water, if you don't have temperature to keep from freezing, it's -- It adds to the value of life.
♪♪ Kevin: Hey, Nathan.
Nathan: Hey, Kevin.
How's it going?
Kevin: Going alright.
So, the hottest thing in railing systems right now.
Nathan: Cable rails.
Kevin: They're everywhere.
You must install a lot of these.
Nathan: We do.
Inside, outside, presidential, commercial.
Lots of applications for it.
You just need to know what kind of fitting you're gonna use.
I mean, there's a lot of options.
You can see here, we have clips, we have lags, we have ones that go all the way through the post.
Kevin: Okay.
Well, let's go through the options.
You did some shopping for us?
Nathan: So, I did.
I have a little bit of a low and then I have a high-high.
So, starting at the low, we have this fitting here that -- This is the tensioning end.
This would be kind of like your anchoring end.
You just slide your cable right in, and then you have to swage it into place.
Kevin: What is this swaging thing?
Did I get that word right?
Nathan: Swaging.
So, with -- You're gonna pick up a swaging tool.
It has different dies.
Find the one that fits the fitting.
And you're gonna hydraulically compress and crimp that fitting onto that cable rail.
Kevin: Push the cable into the fitting, and then, is that what I'm looking at right there?
Nathan: So, you see I crimped this one and I crimped that one, and it's not going anywhere.
Kevin: Uh...does that also mean that if I make a mistake, it's not going anywhere?
Nathan: Not as user-friendly.
Yeah, you know -- Kevin: So it's a one-and-done.
Nathan: Yeah.
Buy plenty.
But if you get it right, you know, over time, if they're slack, you have your tensioning end, so you can make it tighter.
Kevin: Right.
And let's just get that tensioning idea.
You've left a little room right there.
Nathan: Very important to leave those threads exposed.
Each manufacturer is a little bit different, but about 3/4 of an inch of threads to be able to tension and tighten that cable not just once, but over time.
Kevin: So, as we turn and those threads go away, we're actually moving the whole device, making it taut.
Nathan: Move it over, and once you like where it is, you're gonna lock it out with this nut right here.
Kevin: Got it.
Nathan: This is probably the most common.
Really easy to install.
Lag-bolt style.
So, this one here, you're just drilling one hole into the post.
Kevin: So the coarse thread is gonna lag it into your post?
Nathan: Exactly.
Bury those threads, leaving those fine threads exposed.
Kevin: So, the cable is going in on this end?
So if I push the cable in, it will grab itself.
Nathan: Mm-hmm.
Kevin: I don't have to -- Nathan: Very easy to install.
Just push it right in.
This company sells a tool that you can buy that you can slide right into here.
You can see, it's actually gonna release -- Kevin: And if I made a mistake, I can use this to take it back out.
Nathan: Yep.
Kevin: Ooh!
Oops-friendly.
Nathan: I like it.
Kevin: So, maybe we can install one, and you can show us some of the techniques.
Nathan: I built a little mock-up here.
We're ready to just put those lags right in.
Kevin: So, these are just pilot holes, right?
Because the lag is actually gonna do most of the work?
Nathan: Yep.
Just a pilot hole.
So, this company sells a tool here that I can chuck right into my drill.
It has some fine threads.
[ Whirring ] Now I can take my lag with the fine threads.
Kevin: Which is for the fastener side, so we're not doing anything with the coarse threads there.
Nathan: So, I'll put that in there.
Kevin: Coarse threads are buried.
Look at that.
Nathan: Alright.
Can't forget to put the nut on, 'cause that's when it's gonna lock out the tensioner.
Kevin: Yep.
Nathan: Then we can thread on our end.
Kevin: So, now we're leaving just enough there so that we can actually take the slack out.
Nathan: Correct.
The longer the run, the more threads you're gonna want to leave exposed.
And it's really important to take all that slack out of your cable before you tension it.
Kevin: Alright.
Nathan: So, we can install the other side.
Kevin: Same process.
Nathan: Same process.
Alright, now that we have that on, we can cut ourself a short, little piece of cable.
And this one's really, really easy to install.
So, I'm gonna roll these together, make sure that they're all nice and tight.
I push it in.
Bottom it.
Kevin: bottom.
Nathan: And pull back.
Kevin: Come on!
Nathan: Give a pull on that.
Kevin: Yeah, look at that.
That's not going anywhere, huh?
Nathan: Nice and tight.
We can insert it.
Alright.
So we're nice and tight there.
We're nice and tight there.
Kevin: But you've got a little bit of slack.
Nathan: A lot of slack, so we're ready to tension.
So, what I'm gonna do is, I'm gonna lock out this end.
Alright, good.
So, now we're gonna tension on this end.
So, what you do is, you just, first, hand-tight.
Get it hand-tight.
And then I'm going to...
So, we're gonna add tension.
Lock it out.
Kevin: That's terrific.
So, looks great.
Made out of stainless steel.
Maintenance, upkeep?
What do you think?
Nathan: Absolutely.
There's maintenance with everything in life, so... Kevin: [ Laughs ] True.
Nathan: Just a little bit.
Not too bad.
First thing is just keeping them clean.
I brought a few things with me.
So, nylon brush.
If you have any dirt, debris, heavy salt build-up if you're near the water, go down, we'll clean those cables off.
We'll look at our fittings, clean those off, if needed.
Kevin: Okay.
Nathan: Just a little bit of cleaner.
You know, you can use a wet, soapy rag.
You can use some rust cleaner, if there's any rust build-up on it.
Spray it on, wipe it off.
Lubricant -- very important.
These are swiveling ends, so we want to hit that point.
We might even pull this little rubber seal back, put a little bit in there, 'cause some salt and some debris can sneak in behind this.
So we'll just keep that clean.
Kevin: And how frequently would you be doing something like that, in terms of either the cleaning, the protection, or the lubricant?
Nathan: Minimum once a year.
Kevin: Yeah.
Nathan: Once a year, I would definitely go out and clean it.
If you live near the water or in kind of a harsh environment, you might want to do it twice a year.
Kevin: Okay.
Nathan: And the most important thing is giving ourselves to tension this over time.
So, after a year, go back -- or even six months -- go back, look at it, check your cables, see how much flex you have in it, tension it up, lock it out, and then you're good to go for another year.
Kevin: So just tune it up.
Nathan: Yep.
Kevin: Beautiful.
Alright.
Nathan: Keep it tight.
Kevin: Well, I understand why they're popular.
They look terrific.
So I think people are gonna really benefit from having the options like that.
Nathan: Absolutely.
Kevin: Thank you, Nathan.
Nathan: You're welcome.
♪♪ James: Alright, Richard, thank you so much for coming by.
Richard: Glad to be here.
It's a great house you got.
James: Thank you.
Yeah, I've actually been in this house nearly my whole life.
I bought it from my parents.
Richard: You get a good deal?
James: Yeah, they gave me a pretty good deal.
Richard: Good.
Alright.
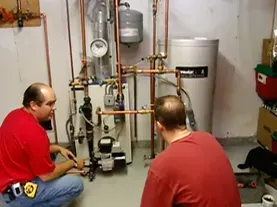
James: And, so, this actually used to be the boiler room.
And so, growing up, it was a really loud boiler.
It smelled.
You could hear it when it was running.
Richard: [ Imitates rumbling ] James: Yeah, exactly.
And, so, there used to be an oil tank over there.
Richard: Got it.
James: A big boiler here that was doing all of the heating hot water, as well as the domestic hot water.
Richard: So a tankless old boiler.
Okay.
James: Exactly.
Richard: So, where did that go?
Is that long gone?
James: The boiler, at some point, started to leak, and so I had to make a decision to replace it.
I have solar on my house, and I thought, "Hey, maybe I could put in heat pumps for most of the heating in the house, and then, for my domestic hot-water supply, I can use this hybrid hot-water heater."
Richard: And do you do this yourself?
James: Yeah, yeah, exactly.
Richard: So you've got heat pumps, you've got heat pumps.
Why am I here?
James: That's actually a great question.
So, there is not heating in the bathroom now.
So, there used to be heating through the baseboard hot water, but -- Richard: You abandoned that.
James: Exactly.
The bathroom's been freezing.
Richard: Alright.
So, this is not uncommon.
You put heat pumps in, but it doesn't hit every room, so now we've got to think about how to provide heat for that local space.
James: Right.
Richard: So, you've got a hot-water source here.
I see that you left a couple of T's here.
What are you thinking?
James: I was sort of thinking that maybe we could do radiant heating.
Richard: Okay.
Well, for radiant, you need a hot-water source.
You've got it right here.
You've got the two tappings right here.
You've got a board right here.
Where's the existing bathroom?
Where are we trying to put the heat in?
James: So, the bathroom is actually right in the other room.
I'll take you and show you that.
Richard: Okay.
Okay.
James: So, this the laundry room here.
Richard: Finished it all up beautifully.
James: Thank you.
Yeah, it's -- Richard: You stay long enough, you get the projects done.
James: It's been a long time, a lot of work, but... Richard: And a man cave here?
James: Yeah.
So, well, it used to be the man cave, but -- Richard: Kids' playroom?
James: Kids have taken over.
Richard: It's the changes in life.
James: Yeah.
Richard: Alright, so, bathroom is right above us here?
James: Yeah, exactly.
Richard: Okay.
So, when you think about adding radiant in a retrofit, you've got to think about having open access to the joist base, 'cause we'll need to put plates and tubing up under the underside.
And this really looks like a perfect candidate.
But it is a lot of work.
And I know you're not afraid of work, right?
James: No.
Richard: Let me run to the supply house and then come back with what we need to get rollin'.
James: Perfect.
♪♪ Richard: Alright, so, these are the transfer plates that we're gonna use.
They're designed 4 inch wide, aluminum, about 4 feet long.
And you can see there's two different size tubing can be accepted.
So, we're gonna use the smaller-size tubing, like this.
And those will attach to the underside of that subfloor.
James: Okay.
Richard: Okay?
Now, the tubing will work its way back to our manifold right here.
We've got a supply and a return.
You can set the flow.
You can see the flow.
And there's temperature gauges right here.
The question is now how do we supply it?
This water heater is filled with the hot water that you're gonna use, you and your family are gonna use, to shower and everything else, but what we don't want to do is, we don't want to contaminate that water.
So in a potable-water system, if you have uncirculated sections of potable water, it can be a breeding ground for legionella bacteria, 'cause that water in the radiant will sit all summer long uncirculated.
So, what I want to think about is to introduce a heat exchanger between the water heater and the radiant system.
Now, inside this block is this heat exchanger right here.
If you look down here, there's a series of stainless-steel plates.
What happens inside is that in one layer, the pump will be from the water heater, and the liquid will go this way from the water heater.
On the next layer up... the water will go the opposing way with a different pump.
So now what happens -- on each layer, it's going in different directions, and you are now transferring energy from the water heater into the water for the radiant, but they don't mix, alright?
So you completely protect the potable-water supply over here while having a protected system over here.
Okay.
James: Yep.
Richard: So, what's also in here are these two pumps, right?
One pump is gonna send water through the radiant all the time, you know, when you have a demand, but this one will come on as needed to just put the right amount of energy into the radiant.
So now, with this control, you can send just the right water temperature out to the heating system.
So if it's 68 degrees outside or colder, the water temperature floor goes out there.
As it gets colder, the floors get warmer, and you stay 68 all the time, okay?
James: That's amazing.
Richard: Alright?
It's just like having a boiler, except there's no flame in it.
We're using the energy from the water heater here.
That means that we now have a closed system.
And when you have a closed system, just like your old boiler, we have to think about expansion.
Anytime you heat water, it needs to expand.
So we'll need to make sure we add an expansion tank right here.
We also have to have a fill valve that will put the right water pressure to go into the heating system.
And, finally and probably most importantly is, there's a relief valve right here, so if any of these didn't work, it would relieve to safety.
James: Okay.
Richard: That is your parts and pieces, alright?
You ready to get started?
James: Yeah.
Let's do it.
Richard: Okay.
To get started, we'll mount the manifold and the pumps to the wall so we'll know how long to cut the tubing for the rest of the floor.
James: Alright, that should be good.
Richard: While we're here, we can also connect the pipes between the manifold and the pump block using a solder-less press connection.
So, with this tool, completely close it onto an O-ring.
That's a fabulous connection.
[ Whirring ] Alright, while I get the piping ready, I need you to notch the blocking in between the joists underneath the bathroom just enough so we can slide the plates all the way across the room.
♪♪ The metal plates increase the surface area being heated from the piping, which will increase the output to the floor above.
We'll add two rows of plates per joist bay, which will loop up and back.
♪♪ I'm drilling these holes close enough to the subfloor so we don't have to bend the packs too much, but low enough that they won't risk being hit by nails or screws from above if you ever change the floor.
♪♪ We got all the plates up.
We got our holes drilled.
Now it's time to feed this.
You're gonna be in charge of the coil, alright?
James: Okay.
Richard: You have one job -- just to feed enough to me, and I'm gonna weave it in between the joists.
Now we start weaving the packs into the joist base.
We'll start with the section farthest away from the manifold and work our way back.
I've pulled these loops between each joist to try and keep the piping organized as we weave through each bay.
Like Tom Sawyer, having you do all the work.
James: [ Chuckles ] Richard: Alright, now you can put your insulation back in the drop ceiling.
If you didn't already have insulation, I would highly recommend adding some.
If you're gonna work this hard to make heat underneath the bathroom floor, we want to make sure it's going in the right direction.
Now we can make the connections back at the manifold.
Finally, we can connect the whole system back to your hot-water heater.
[ Whirring ] Alright, James, we refilled it, and there was no leaks.
even on your stuff.
James: Not too bad.
Richard: [ Laughs ] Let me plug this in.
Okay.
So, that should come on in a second.
So, just to review what we've done, we've got heated water from the water heater coming here and coming into this side of that heat exchanger.
We've added one important quiet thing here, which is a check valve.
We want to make sure the liquid only goes this direction, doesn't go the wrong way through the water heater, okay?
It comes through that heat exchanger with a pump and then comes back a little cooler back to the bottom of the water heater to be re-heated, okay?
That's the primary side.
James: Okay.
Richard: On the secondary side, it's the stuff we've talked about.
A relief valve, an air eliminator, a fill valve, and an expansion tank.
And those are the important safety devices in there.
James: Okay.
Richard: And we've got a manifold here with shut-off valves, temperature gauges, and with two loops -- We were only using one, so I put a little jumper piece of tubing just to be safe.
The nice thing is, you only have one loop that you're using.
Your kitchen could be a little cold.
You could actually -- Now that you're a pro at this, you could actually use a little extra tubing, 'cause you got some left over, and run it in there, too.
James: That's not a bad idea.
Richard: Alright?
So, I think that's it.
I wish you a very warm winter, this one and forever.
James: I appreciate it, Richard.
It was great working with you.
Richard: Great.
This is a lot better mechanical room than it used to be.
James: It is.
That's for sure.
♪♪ Kevin: Hi, Jenn.
Jenn: Hey, Kevin.
Kevin: What are you looking at here?
Jenn: Well, just the USDA's Plant Hardiness Zone Map.
Kevin: Ah!
You're such a dork.
Jenn: Well, you know, it shows you what plants to put where, what survives in what region.
Kevin: Right.
So, specifically, what are we measuring right here?
I've seen it before.
Cold, sort of the warm, top to bottom.
But what are you actually measuring?
Jenn: What this map does -- right?
-- it measures the coldest temperature calculated on an average over 30 years.
So the last map was from 1991 to 2021.
They record the coldest temperature over those 30 years and then they put it all together and they make an average and they assign you a zone on the map.
Kevin: And the reasons we care just about the coldest?
Jenn: Just about the cold.
Kevin: Why?
Jenn: So, this plant right -- Say, for instance, this boxwood.
Like, this hardiness zone is negative-30.
What did you see on the map?
What's negative-30 degrees Fahrenheit?
Kevin: Negative-30 degrees.
Says that's Zone 4a.
Jenn: Mm-hmm.
Kevin: Negative-30 to negative-25.
Well, that's a hardy plant.
Jenn: Yeah.
So, you know, this will survive in those temperatures, especially with snow cover, and you have, you know, extra moisture and stuff in there.
Kevin: So this about survivability.
This is the tool that you will use to, say, put the right plant in the right place, and it will hopefully come back next year.
Jenn: Exactly.
When I'm looking at my nursery catalog and I'm doing a design, I pick -- It used to be just Zone 5 plants, right?
Because Boston was Zone 5a and b, and then it's kind of changed over time to 6a and b.
And now it's 7 on the coast.
Kevin: Whoa!
So is that the headline here?
We have changed and it's warmer.
Jenn: Yes.
Kevin: So, what are those zones again?
We went from what to what?
Jenn: 20 years ago, it was Zone 5a and b. Kevin: And now... Jenn: And then it went to 6a and b, and now coast is 7, and in Boston, where I live, is 6b.
Kevin: So that's what happened here.
Did that happen across all of the zones in the entire country or -- Jenn: Not everywhere changed.
Over time, as technology has improved, there is newer weather stations.
So this last map was based off of 8,000 weather stations across the country, and over the past 10 years, it's increased to 13,400.
Kevin: Ah!
More data points.
Jenn: More data points, which means more accuracy.
What they came up with -- only certain areas changed.
So, you really have to punch in your zip code, go to their website on the USDA, and then it will bring you right to your neighborhood.
Kevin: So, it says Boston is now Zone 7a.
Jenn: Yep.
Kevin: Which means that it can tol-- The coldest day is gonna be somewhere between zero and 5 degrees Fahrenheit.
Jenn: Mm-hmm.
Kevin: And if we were to actually take the map and click on Boston... Jenn: Yep, try it.
Kevin: ...it's going to -- Oh, there, it brings us to Boston.
Jenn: So, you go to the picture.
Here's the 7a.
That is this along the coast, right?
Kevin: So, light green is warmer.
Jenn: Mm-hmm.
Kevin: Which makes sense, 'cause it's near the water.
Jenn: Right.
And then you can see the contrast when it switches to 6b.
Kevin: Right.
So, when you see this and you think about our backyard that you work in, like, how do you think about it?
Jenn: Well, it's interesting.
We might have the opportunity to work with warmer-weather plants.
So I might sneak something in here and there, you know, especially if there's a little microclimate in someone's yard, you have a south-facing house, and you know the wind's not gonna rip through.
It's gonna be more protected.
So I might try.
I'm not gonna do a whole hedge of something that could die.
Kevin: And should this new data and the new map affect the way I think about the summertime?
Like, does it change what I think about with my vegetable garden or is my lawn okay?
Jenn: Your lawn's okay.
Your established plants are okay.
All the trees, shrubs, and perennials are the ones that, during the wintertime, will be affected.
Kevin: Gotcha.
Jenn: So keep on growing all your veggies and stuff.
Kevin: Alright.
Well, I love more data and an updated map.
So that's good information.
Thank you.
And, of course, it begs the big question.
Jenn: What's that?
Kevin: Why does anybody live in Northern Maine?
Jenn: That has the blueberries!
Kevin: Minus-60.
Jenn: It's pretty brutal, yeah.
Kevin: Alright, well, that's it for us, but plenty more coming up next time, so until then, I'm Kevin O'Connor.
Jenn: I'm Jenn Nawada.
Kevin: For "Ask This Old House."
[ Shudders ] Kevin: Next time on "Ask This Old House," Jenn and Nathan are heading to Tulsa, Oklahoma, to install a rain barrel.
Next, Mark identifies and repairs the cause of pooling water on a small section of a homeowner's brick patio.
And the team discusses a few recent additions to the tool bags that are coming in handy.
Tom: 17?!
Mauro: I'm not kidding.
Kevin: All that on "Ask This Old House."