Kevin: Today on "This Old House"... Jenn: I'm going to visit a community garden that has a special connection to our project house.
Tom: And we're framing over the old concrete slab to make it level.
Richard: And we're gonna be replacing this 100-year-old clay sewer line without digging a trench.
It's good for the next 100 years.
Craig: It's good for the next 100 years.
♪♪ Man #1: Got it?
♪♪ Man #2: Ahh.
That's it.
♪♪ ♪♪ Kevin: Hey, there.
I'm Kevin O'Connor.
And welcome back to "This Old House" and to our project here in Glen Ridge, New Jersey, where there have been a lot of developments.
Check this out right here.
So, the house was built in 1887, and you may recall there was a porch that ran all the way across the front.
Well, Zack and his crew took the porch down.
All of it came down in a day.
And you can see that we've exposed the original cedar shingles right here.
Not in the greatest shape.
And, sadly, we were hoping, up on the gable there, that there would be a diamond pattern that matched the neighbors' house on our left and on our right.
That is not the case.
And so that's probably going to weigh into the decision with what we do with these shingles.
Hey, Zack.
How are you?
Zack: Hey, Kevin.
Kevin: You have been a busy man.
Zack: Very much so.
Kevin: A lot of progress, through.
We like to see it.
So, I know that we were hoping for diamond shingles, maybe trying to save these things.
Seeing what you now know, what do you think?
Zack: So, we're gonna stick with what was approved by the Historic Society.
We're going to remove the existing shingles, 'cause you can see they're definitely at the end of their life.
We're gonna replace it with a like kind.
This is actually gonna be clapboards, shakes, and that diamond pattern on the gable end.
Kevin: With new material.
Zack: Exactly.
Kevin: Got it.
Okay.
So, another change that I notice is this bump-out here from the house.
Some of it was gonna be saved, but now the whole thing is gone.
What happened?
Zack: So, pretty much what happened was, we uncovered some pretty extensive termite damage.
This was a post that was actually carrying a substantial part of the first floor, and you can see that was damaged.
And a lot of this original structure had extensive termite damage.
We sort of got to that point where we were weighing the labor costs to fix everything and we were at such a crucial point that it just made more sense to rip most of everything out and give them a nice solid, new floor.
Kevin: So, did you find this all over the place in here?
Zack: Pretty much all through this addition and even in the main floor here.
It was in the joists.
It was in the posts.
It was in the rim.
Kevin: The entire first floor is gone.
Zack: We're actually gonna take that whole second floor out, as well.
Kevin: Ooh!
The second floor is coming out, too?
Zack: Yeah.
Kevin: Why?
Zack: Well, I'll let Sean have to explain it.
He's the one who's gonna have to help us take it out.
Kevin: Sean, he's putting this second floor on you.
Sean: Yes, he is.
Kevin: What's going on?
Sean: So, after we took out the first floor, shot elevation for the second floor, 3-1/4-inch drop in the middle.
Kevin: So it was sagging 3 1/4?
Sean: It was, yep.
Kevin: That's a lot.
Sean: Yeah, it is a lot.
So, to repair that, we would have had to do probably 65%, 70% repairs on all the joists anyways.
So, after that, we decided, "Let's just take it all out, start fresh with a brand-new floor system, keep it perfectly flat and level for everybody else down the road, as well.
Kevin: Yeah, you got some floor guys, some tilers, some finish-work guys who are all thanking you for that.
Sean: Yeah, they are.
Kevin: Does it change your workflow at all?
Sean: It does.
So, what we did is -- originally, this 14-inch beam you see here was gonna be dropped.
So it was gonna be below the floor joists.
So, now, since we're taking out the two floor systems, it allows us to raise it up flush so you have a continuous head height through our kitchen right into the other room here inside the house.
Kevin: Very good.
So a lot of changes over the last week.
Where does that leave you in terms of what's next and what's got to be done?
'Cause you're kind of playing catch-up now.
Zack: We are.
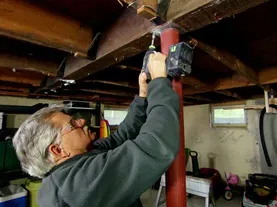
So, we've got some structural work in the basement that we got to do out of sequence.
Let me show you what's going on there.
So, you can see it looks a little bit different down here, right, Kevin?
Kevin: Holy mackerel.
It does.
Last time I was down here, we had old heating equipment, new cooling equipment.
Everything is gone.
Zack: So, we had a few changes, like we said, to remove all this flooring, and we had two options -- an 11 7/8 beam with two columns supporting it or a 9-1/4-inch center girder.
And the difference was, we would have needed an additional post with the shorter one.
Kevin: Which you went with the shorter one.
Zack: We went with the shorter one, because look at all of the head height.
You can see these floors are all different levels, so we may have to bring this floor up.
So I wanted to make sure people could still get under it regardless of the floor height.
Kevin: Okay.
So we're gonna put in three Lallys instead of two.
I see two pits dug, one to go.
Zack: Right.
We got to get started on this.
Kaylen and Luke are gonna work on that.
But we got to break this one open.
Kevin: So, normally, I would think we'd have -- What do you want to start with?
This?
Zack: Yeah.
Kevin: Footings and posts in before the floor system?
That's not the case here.
Zack: It's not because we're a little out of sequence because we weren't planning for this.
A week ago, I had no idea we were gonna remove this floor system, 'cause we hadn't uncovered the termite damage.
So, we've got these temporary supports, which are supporting this beam.
We're gonna dig these holes.
I've already called for an inspection tomorrow.
Kevin: The joys of working with old houses, right?
Zack: Right?
Exactly.
Kevin: Alright.
♪♪ And, so, your formula is what?
Zack: So, they're gonna be 3 feet by 3 feet by 1 foot deep.
Kevin: Yeah.
Zack: With rebar and an inch of gravel at the bottom.
♪♪ ♪♪ Kevin: Okay.
That's down.
Zack: Alright, that's nice and flat.
I'll drop the rebar in.
Kevin: Yeah, mesh here, all wired up.
Zack: Yep.
Kevin: Sitting on some paint.
Zack: Alright.
Well, thank you very much for the help.
Kevin: My pleasure.
Zack: We're gonna get the inspector to sign off on these three, and then we can pour concrete.
Kevin: Very nice.
Alright.
Looking good.
Zack: Alright.
♪♪ Jenn: I recently learned about a community garden here in Glen Ridge called Freeman Gardens, and it's been flourishing since 1935.
I'm also told that there's a really cool connection between our project house and these gardens.
And what a great welcome.
Hey, Kevin.
Kevin S.: Hey, Jenn.
Welcome.
Jenn: Thank you.
You want to tell me about your gardens here?
Kevin S.: Sure.
It was a garden planned in 1935.
And it was an estate garden, and the family passed away in '67.
And the heirs gave it to the town for the community.
Jenn: Oh, that's fantastic.
So, what's the layout of the place?
Like, what's here?
Kevin S.: So, we have a formal rose-garden area.
There's a woodland walk up in the back.
Jenn: Okay.
Kevin S.: And up here is an Italian niche area.
Jenn: Like, more formal?
Kevin S.: Right.
More formal.
Jenn: Okay.
Kevin S.: With a dolphin fountain spitting into the pool.
Jenn: Cool.
So, what's the connection with our house project and these gardens?
Kevin S.: Ah!
So, the Freeman family owned the corner house.
And they developed the gardens.
But their first house in town was your project house that you're working on now.
Jenn: Wow!
So that's when they first came to town, and then they went out in the community and did all of this.
Kevin S.: Yes.
Jenn: Now it's community gardens, right?
Kevin S.: Yes.
Open to everybody.
Jenn: Okay.
Well, I would love a tour.
Kevin S.: Sure.
Jenn: Alright, let's go check this out.
Kevin S.: So, here's our koi pond.
Jenn: Beautiful.
Kevin S.: You have the clumping bamboo.
I put that in two years ago or so.
But all the bushes I put in recently.
The Hakone grass is great, because when it does grow large, it undulates in the wind as it blows.
and it just -- It's movement and it looks -- Jenn: And it doesn't get too big, too, right?
Kevin S.: No, no.
And I keep control of it.
Jenn: Mm-hmm.
Kevin S.: I have a Ginkgo tree over there, which, to me, is very Asian, so it will fit well with the pond.
Jenn: Yeah, that leaf shape.
Kevin S.: Right.
And hopefully it will grow big enough, so kind of shade it also.
Jenn: Mm-hmm.
Kevin S.: Would you like to see the rose beds next?
Jenn: I would love to.
Kevin S.: Okay, so, these are the rose beds that were laid out in kind of an arts-and-crafts style, which was very prevalent back then.
We have about 100 roses in here.
This bed was once roses, but I reclaimed it to put some annuals and perennials in here.
Jenn: Mm-hmm.
Kevin S.: We have gladiolas, which come up every year for us.
These are Dahlias, but I have to dig the tubers up, store them in the chicken coop over the winter.
But then I plant them out again.
And they thrive.
Jenn: Then you don't have to buy them again, right?
Kevin S.: Well, that's it.
That's it.
Saving the money.
This is Joe-Pye weed, and this just thrives.
The bees, the butterflies, everything loves it.
It's a really great plant.
Jenn: It gives you some nice height, too.
Kevin S.: Yes.
So, this is our vegetable bed.
It's not as big as it was during COVID, but we have a couple tomato plants, some basil, strawberries, some different stuff.
Jenn: And it looks like repurposed stone here?
Kevin S.: Yes.
This stone came from a house in Bloomfield that they tore down.
It was from 1760s.
Jenn: Yeah.
Kevin S.: So this is all hand-cut stone.
Jenn: What a great way to make a raised bed.
Kevin S.: Yes, it is.
And it's heavy, though.
[ Both laugh ] Jenn: I just want to say thank you for the tour, and I really love how you involve the community.
And you're doing a really good job resurrecting and keeping it to the state it was supposed to be in.
Kevin S.: Well, thanks.
It's a labor of love.
Jenn: Of course.
Always.
Kevin S.: [ Laughs ] Jenn: Alright.
Nice to meet you.
Kevin S.: Good to meet you.
Jenn: Alright, thanks.
Kevin S.: Come back again.
Jenn: Alright.
Take care.
♪♪ Tom: Hey, Zack.
How's it going?
Zack: Hey, Tommy.
Tom: Lookin' good here.
Zack: It's coming along, right?
Tom: So, what's going on with this slab?
Zack: So, this slab was an addition, and it's a little bit -- about 3/4 of an inch out of level.
Tom: I can see that.
Zack: Yeah.
So it's not level, so when we reframed all of this floor, we actually held it up an inch above the highest point, and that allows us to get sleepers that we have enough meat to nail into and we get some insulation, so we get a thermal break from that slab on the subfloor.
Tom: I see.
Now, what have you got on this slab?
It looks like you've coated it with something.
Zack: Yeah, this is actually a roll-on membrane.
One coat retards vapor, and two blocks it completely.
So it will keep that moisture from traveling up into the subfloor.
Tom: Well, that's good, because I know, when this slab was probably poured, they didn't have a vapor barrier there, so that moisture would run up and get underneath the floor systems.
Zack: Exactly.
Tom: Alright, so you're air-sealing around the perimeter and then you're ready to install the sleepers?
Zack: I'm just gonna put this last piece in, and then we can start cutting these sleepers.
Tom: Alright.
I'll give you a hand.
Alright.
That looks good.
Zack: Alright.
So, I've got these pressure-treated 2x4s.
Tom: Yeah.
Zack: And got them cut to length already.
Tom: Okay.
We place it on.
I see you've got them all marked off.
Zack: Yep.
Tom: I can see this lines up with the joist on the other side of the house, so all the sheathing joints will line up great.
Alright.
So, I can see that the slab is pretty straight, but you do have a dip in the middle there.
So are you gonna scribe this?
Zack: No, there's not a lot of undulation.
So if we just push some weight on it to make sure we follow the contour of the slab, we can just snap a line across the top between the two level ledgers.
Tom: That's a good idea, and it'll save some time.
So, I'll hold it down if you want to snap that line.
Zack: Alrighty.
Tom: Match it up with the other floor.
If I step on it, push it tight to the slab, you can run your line all the way across.
Zack: Alright, that looks good.
Tom: Perfect.
Zack: So, let's test-fit this to make sure it works.
Then we can put some glue down.
Tom: Okay.
I'm good here.
Zack: Looks good to me.
Tom: Looks good.
Zack: We'll put it on the line.
Tom: Good.
Zack: So, we're gonna fasten these sleepers down with this nail gun, which has hardened nails, which are approved for concrete.
Tom: Right.
That's a high-pressure gun, too, so that will drive those nicely.
Alright, here's the insulation.
The 1-inch Styrofoam right here.
Use it on top of the concrete and underside of the sheathing.
It will act like a great thermal break.
Zack: Yeah, that's gonna help a lot.
And we ran these through the table saw, so they should work nicely as spacers for our sleepers.
Tom: Right.
And that will put all the sleepers 16 on center.
♪♪ ♪♪ Lay it down, line it up.
Alright.
It marries together really nicely.
Got a nice even floor there.
All tied together.
You'll never know there's a concrete slab under here.
Kevin: In a continued effort to help raise awareness around the trades as part of our Gen NEXT initiative, I took the opportunity to talk with one young man who's spending his summer here on the framing crew.
Brandon: Hello.
Kevin: So, I was just over there talking to your dad, talking to the crew, and I was watching you guys busting it out.
And then I started looking at you and I'm thinking, "One of these things is not like the other."
[ Laughs ] What's the deal?
What's your story?
How are you on this crew?
Brandon: So, my dad and my uncle own the company, and I joined last summer was when I consistently started working.
So this is my second summer on.
And I just work during the summer, and then, whenever I have time off on school, I come out.
Kevin: You're in high school.
Brandon: Yes.
Kevin: How old are you?
Brandon: 15, going into my junior year.
Kevin: Wow.
Brandon: Yeah.
Kevin: So you're on the framing crew at 15 and you started when you were 14.
Brandon: Yes.
Kevin: What do you think the life lessons are, like, when you think about that?
Brandon: It's definitely humbling being out in the heat, and a lot of heavy lifting going on, especially carrying lumber.
But it teaches you how to work hard and be consistent, I guess.
Kevin: What'd your dad think when you got into the business and started coming to the jobsite?
Brandon: He was definitely happy.
Kevin: He was?
Brandon: Because it's difficult to find a lot of employees now, 'cause they did have a decent-sized crew, and it slowly -- with COVID and everything, it dropped down.
So ever since last year, it's been helpful to have somebody do what they don't want to do.
Kevin: And you're working with all the tools, the nail gun, the saws, and all that?
Brandon: Yep, I am.
And they're amazing teachers, for the most part, but I still have a lot I need to learn.
Down the road, I'm looking more into a welding route.
Kevin: And where'd you learn that?
Are you taking that at school or just doing it on your own?
Brandon: School.
We have a pretty good tech staff and tech program, so then, the next two years, I'm taking a two-year welding program for that.
Kevin: Gotcha.
And after high school, do you think you would go right into the trades or potentially to college or some hybrid?
Brandon: I'm thinking about going straight into the trades, maybe a trade school, but I'll feel it out.
Kevin: So, you've been at this for a while.
Now you're doing it through school.
If you had to tell any of your friends or other students about why the trades, why this path, what would you tell them?
Brandon: Well, there's definitely growing demand for it, so as time goes on, there's gonna be a lot more money in it for you.
And, also, it just feels good to work outside with your hands, rather than at a desk.
Kevin: And how would you tell them to get started?
Where would they go?
Brandon: Whatever you're interested in.
If you're interested in welding or carpentry or landscaping even or bricklaying, just go and shoot e-mails or visit different companies and just put the work -- your name out there.
They're definitely always looking for help.
Kevin: They are always looking at that.
Brandon: For the most part, yeah.
Kevin: So you think it's a fairly straightforward path for most people who express interest?
Brandon: Mm-hmm.
Just go out there and ask around.
Kevin: Yeah.
Alright, well, I appreciate it.
Thank you, Brandon.
Brandon: Alright.
Thank you.
Kevin: You got it.
Take care.
I think you're getting the eagle eye from dad over there, so you better get back to work.
Brandon: Probably.
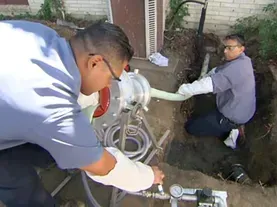
♪♪ Richard: The sewer line on this house is original -- 1887 -- made out of clay.
And it's been an ongoing issue for the homeowners of getting stoppages from tree roots.
They clear it.
Then the tree roots grows back.
So, now, the challenge is really, how do we get a new sewer line from the house out to the street?
Typically, you'd open up a trench.
You'd dig a trench from the house to the street, and if you do that, you then have to open up the sidewalk and go down into the sewer.
So, we found an expert with a camera, and he ran it down and he found that the existing clay line leaves the building right here and actually comes underneath this tree, underneath the cobblestones, and into the main part of the driveway.
Now, if we tried to replace this exactly here, we'd have to trench all here.
The tree goes away.
All these shrubs go away.
The driveway has to get redone.
Well, this system actually means no digging.
It's a trenchless replacement of the pipe.
Craig Scott has a system that absolutely has my attention.
How are you, sir?
Craig: Hi, Richard.
Nice to see you.
Richard: Good.
Take us through the process.
What are you gonna do here?
Craig: So, basically, what we do is, we take this cable we push it up the old sewer line from here into the basement, where we have an access point down there.
We hook a bursting cone to the end of this cable.
Then this machine over here drags the new pipe right through the old pipe, splitting the old pipe out of the way during the process.
One action, one piece of continuous pipe, no fittings.
Richard: That is brilliant.
Craig: One shot.
Richard: I got to see this.
Craig: I'll show you.
We have it right over here.
Richard: Alright.
Craig: Here's the old pipe here.
Richard: Oh, yeah.
Craig: Here's our clay pipe.
Richard: Sure.
Craig: This is the new pipe that we're gonna pull through the clay.
This is the cable we discussed earlier that we pushed up the old pipe.
Hooks to this bursting cone here.
We take this new pipe on the back of here.
This locks in place, drags it through the old pipe.
Richard: So, I get it now.
The cable pulls this thing right through, and this actually is bigger, and it's gonna split.
And as this comes through, it's gonna blow apart this old clay pipe and pull that with it.
Craig: That's correct.
Richard: That is so brilliant.
How do you make the pipe connection here?
Craig: So, basically, right here is almost like one of those toys that children uses that gets locked on your finger.
I have a small piece of pipe here I can show you.
This goes in there like that.
You pull on this.
Richard: Oh!
Craig: As you pull it, that expands inside of the pipe.
Richard: So it's very similar to what the electricians use to pull cable.
Craig: Correct, correct.
Richard: Okay.
Great.
Alright, so, then how much force do you need to be able to break this pipe?
Craig: So, it's a 30-ton hydraulic ram, which we have right here.
This piston here goes in 18-inch pulls.
Hydraulic cables here go to the machine.
There's a foot pedal -- pull and release.
Goes up and down, drags that cable right through here, up and out, pulls the pipe right behind it.
Richard: That is just fascinating.
And then the pipe -- does this pipe come in rolls?
Craig: No.
So, this pipe has to be fused together.
And when we pull it, it's continuous length.
Richard: Alright.
Let's see that.
Craig: So, this is the high-density polyethylene pipe that we discussed outside.
Richard: Yeah.
Craig: Basically, nice and thick, but it's not too brittle, so it won't break as we're pulling it.
Richard: You need it to be strong enough to go through all that broken pipe, but also strong enough to be able to take that 30 tons of pull.
Craig: Right.
And also turns.
If we have to go through small turns, there's no problem with any of that.
So, basically, we put this pipe right in here like this.
These clamps get locked down.
You secure this in place.
Richard: Yep.
Craig: Now we take this, which is basically like a meat slicer for pipes.
It's got two razor blades that spin.
It's gonna shave this down and give us a perfectly smooth surface.
Richard: It's gonna have a milled surface so that it will fuse.
Craig: Correct.
Richard: Look how beautifully that cuts that.
And look at this perfectly milled surface.
I love it.
That will fuse beautiful.
Craig: Yep.
Now we're gonna take the iron that's 400 degrees, place it between the pipe.
We lay that in there like this.
Richard: Okay.
Craig: Once we pull it in place like that, we leave it for 40 seconds so it can melt the pipe to the proper temperature.
Richard: Okay.
Keep holding it.
Okay, 5 seconds.
3...2...1.
40.
Craig: Now we take that out.
Lock this in until we get a nice bead.
Richard: Lock.
Go, go.
Craig: Get a nice bead like that.
Richard: Yep.
Craig: And that's it.
So, now we'll let it sit for five minutes.
It'll cool off, become one piece of pipe.
Richard: Let it rise.
Craig: So, Richard, this is one of the previous joints that we did today.
And this one's actually cooled down already.
Now, you can see it just became one piece of pipe.
Richard: It's perfect.
And that fused seam is as strong as the pipe.
Craig: Correct.
Once that chemical reaction cures, it's like one piece of pipe.
Richard: So, we ready to go?
We got the length we need?
Craig: We're ready to go.
Richard: Alright.
Robert: Lock in the cable to the bursting cone and pull it to secure it.
We use our lag nut going straight through.
At this part, what we do is, we feed the pipe in all the way to the back of the bursting cone.
And then we have to pull to engage the interior.
Richard: Yeah, so that squeezes.
Robert: Squeeze it down just the same way as you would a finger trap.
Richard: Nicely done, boys.
Yep.
Man: Alright, we're ready to go.
[ Beeping ] Craig: Alright, here we go.
Pull.
You want that pipe as straight in as you can get it.
♪♪ ♪♪ ♪♪ Robert: So now you have the head of the bursting cone out.
Richard: Well, that is 80 feet of trench we didn't have to dig.
So I really think it's a great system.
What do you have to do for your last mile here?
Craig: We're basically gonna break the equipment down, disconnect our bursting head, and just connect to the existing main conventionally.
Richard: Great.
Well, thanks for all your help on this.
Craig: Thank you.
Thank you.
Richard: And that will wrap it up for us today here at Glen Ridge, New Jersey.
Join us next week -- we're gonna be finishing our framing and begin our mechanical rough-ins.
So, till next time, I'm Rich Trethewey... Craig: And I'm Craig Scott.
Richard: ...for "This Old House."
You did good.
[ Both laugh ] Kevin: Next time on "This Old House"... Richard: We'll show you a unique and effective way to keep pipes from freezing when you have to run them in the outside wall.
So, what you've done here is actually -- you've almost built a foam trough that goes right around that and keeps these pipes in the building.
Tom: Imagine installing new windows in an old wall without any headers -- we'll show you how.
Kevin: And we'll find out what the homeowners are thinking for exterior colors and why they have to choose so early.
That's next time.