Boom!
Hello, I'm Julia Child.
Welcome to my house.
What fun we're going to have baking all kinds of incredible cakes, pies and breads right here in my own kitchen.
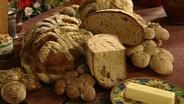
David Ogonowski's known village baker, Joe Ortiz makes these crusty and rustic hand-crafted breads.
Today, you'll learn to make these great-looking loaves at home.
See how, on: [Captioning sponsored by VIEWERS LIKE YOU] These fascinating breads!
There are all these wheat designs that are beautiful decorations and wonderful shapes.
These are all made These are all made out of sourdough whole wheat.
And baker Joe Ortiz is going to explain and show us how to do it.
so we can make our own.
We're going to make it from start to finish.
Including making the yeast.
We're going to make the yeast.
We're going to pull the yeast out of the air by making a starter, a very small starter.
And the beauty of this method is that we can get some of the old-time flavors of sourdough.
And the starter is made with a half a cup of flour whole-wheat flour eighth of a teaspoon of cumin.
Now, what's the cumin for?
Cumin helps to kind of engender the happy bacteria out of the air.
This is one of the old-time recipes.
That's fascinating because I know I've seen a starter made with grapes.
Grapes... you can use honey.
You can use many things.
That's fascinating.
Some purists say, "Just use the wheat."
Just the wheat.
Just the wheat and the water.
We can also use some milk because, you know San Francisco sourdough is lactobacillus.
Oh, it is.
So, that's a specific strain and what we're going to do is use half a teaspoon.
This gives an incredible texture to the final loaf.
Ah, so it doesn't dry out too fast.
This kind of bread lasts for maybe a week... Great!
if it's made right, very moist.
Now, I might add a little water but I'm going to put in just a little bit less than a fourth of a cup here.
And then the whole idea is that we're going to do this just like they used to do in the old days.
With a well in the center.
And the beauty of it is is that you don't need to make a lot of this.
because what you're trying to do is just capture the spirit of the microorganisms in the air and that's a combination of wild yeast and bacteria.
Okay, I can see this is coming together.
And what we're trying to do here is get a firm dough a firm ball of dough.
You call this a "chef."
That's right.
Chef, in French means the first or the chief leavening agent.
Uh-huh.
So, we're almost done.
This is a very quick process.
When we finally have it completely kneaded and we roll it into a ball we can actually see the impression come back.
It definitely does.
So it's alive already.
Oh, it is.
And it's firm.
So, that's important because it's going to expand.
Now, I have one right over here that we did two days ago.
And you can see the little bubbles.
Now, this is the test, too.
See, the impression remains now.
It's not responding.
So that means it's ready.
And it definitely has grown.
It's grown, and what we're going to do is after two days, we take a piece of this roughly the size of a prune or a walnut and I'm going to take this and make a first refreshment out of it.
Wow.
Okay, for the first refreshment I'm going to take three-quarters of a cup of whole wheat flour.
And I'm going to do basically the same thing.
Let's get a quarter cup.
Now, I don't need cumin anymore.
Because you have your... your chef.
I do.
I don't need the milk, but I do need water.
Yeah.
And what I'm going to do I'm going to divide up this little piece of chef here.
This is going to become my yeast.
And I'm going to take a little bit of water a third of a cup.
And I'm going to dilute the levain because when you dilute the levain what happens is that the mixing water takes on all of those microorganisms that we're trying to use as our natural yeast.
And also the flour is giving this natural yeast and bacteria something to feed on.
The whole idea is that this process is a feeding process.
So once that gets almost all diluted we can start pulling in a little more and more.
I use that hand.
This is essentially just the same as the last time.
It is.
We're just building.
We're building our active ferments into a size that we can make bread out of.
And then I'm just going to knead it the way you would a bread dough.
Get the rest of that in and then this is the end of the first refreshment.
Chef number two.
And that is, that's coming back again.
That's responding.
Put it in a bowl, cover it and after 18 hours, that looks like this.
It has about doubled, hasn't it?
Yeah.
And you see how that's reacting now?
Yeah, let's pull it apart and I'll show you.
The beauty of what you can do with this sour is you can get some of those textures that we really like the irregular air bubbles and that kind of shiny, chewy texture.
And now, it's starting to lose some of the cumin flavor.
But it's starting to take on kind of a sweet, alcoholic fermentation.
Sourness, yeah.
Right.
And then we're going to take some of this: a half cup, and make our final refreshment.
In France, they call it the refreshment of tout point which means that it is the total one and that it's ready to be made into bread.
We're going to do that right now.
This, this you could freeze and use again.
You can freeze that.
Yeah.
So, for the second and final refreshment we're going to use three-quarters of a cup of whole wheat flour.
And then, I'm going to kind of take this to a little whiter bread.
A totally whole wheat bread is a little bit too much for a lot of people.
And it also doesn't rise-- it's heavy.
That's exactly right.
So, what we're going to do is we're going to add a little bit of white flour.
That's about half a cup there.
There's a half a cup.
In France, they call this le fontaine, the fountain and in America we call it "the well."
And we're going to do the same thing.
The same thing, again.
And this is about a half a cup of water.
But you see how this is starting to get elastic?
Mm-hmm.
It looks like a real mess.
Yeah, that's what I love about it.
( chuckles ) Reminds me of my old painting days, you know?
Yes.
And I can tell that's going to work out as far as the amount of water.
You have to do it a lot to really get the feel of what's right don't you?
You really do.
You know, this is kind of an experiential bread.
It's not what you'd call a slam-dunk.
No.
So you've got to be willing to get in and kind of play with it and learn as you go.
And learn the feel.
And I always tell people, you know... they say "When is it ready, when is it ready?"
Yeah.
And my answer is "You have to guess sometimes."
Because if you don't guess you'll be making yourself miserable, you know.
So guess and then you learn for the next time.
Sure, trust your instincts.
We're only going to take a portion of this to make the actual bread.
But this is what it looks like when it's done: a nice dough.
We're going to let that rise.
And this one's only going to rise for four or five hours.
It's going to look like this.
This one really came out.
It really has, it really raised, yes.
Again.
Look at that!
We have a nice, beautiful texture.
and that's what we're trying to get in our bread.
We want our starter to look like what our bread wants to look like.
Okay.
And so we're all done with that.
We're going to take the levain that is totally ready to make our final loaf.
And for the final loaf we're going to go with all-white flour.
Uh-huh.
We got the whole wheat for the taste then we're going to put the white flour in to get some volume.
Go with three cups.
And I want to be real careful with my mixing now... on my measurements.
It's approximately the amount of levain that's about the size of a very large orange.
Uh-huh.
And then once it turns into bread we add the salt.
That's because the salt would impede the progress of the yeast, I guess?
Right, and the salt's going to give some flavor.
Two and a half teaspoons and a cup and a quarter of water.
I'm going to be real careful on my water, very careful.
But you know, this is not an exact science, either because, you see, this levain is hydrated; it's gotten wet.
So that's why I am going to be real careful with my water.
I'm not going to put the whole amount in.
I might add a little bit of it later.
I don't want it to be too wet.
That's dissolving the salt.
And what's the first thing we do?
You break up that.
Yes, dilute the levain.
Do you want to touch that see how great that feels?
That's a very sensuous experience.
See how I'm going around the edge here?
I can see how careful you are.
You're just pulling in a little bit of flour at a time.
I'm going to take a little... Another reason I left water out is that when you make a sculptured loaf sometimes it's nice to have a firm dough.
When you're going for texture in the bread it's nice to have a wetter dough.
A normal dough would almost be about that wet.
That wet.
It seems pretty remarkable.
Maybe a little bit more.
Maybe there would be that much flour in it, okay?
But I'm going to make this firm because we're going to try to do the decorated shape with it.
But it doesn't smell anything like a dough with packaged yeast.
I think this brings out more of the natural wheat.
It does, the natural flavor of the grain itself.
This is the final kneading.
We're trying to get as much elasticity as we can.
Get the dough as homogeneous and as smooth as we can.
Uh-huh.
And that's about all you need.
You know, all that stuff we were doing helped to really develop the gluten.
Completely done.
I'm going to grab my bowl.
Cover it.
We're going to let it proof for five hours.
Well, that's after the five-hour rise.
Yes, I would like it to have come up just a little more but you can see that it has risen.
Usually if it's totally risen the indentation will stay.
All right, so, we're ready to shape this into a loaf.
The first step is to pull it out.
And what I want to do is I want to take about half of it and use for the background.
It's going to be kind of the basic loaf.
And I'm going to kind of set it aside and then I'm going to make a braid.
I'm going to take about 25% of the dough off for the wheat stalks.
There's the wheat stalks and then this amount is going to be for my braid, okay.
And I'm going to get the braid started first, okay?
Because it's hard to get them as long as you want them.
You take this.
Round it into some baguette shapes.
The heel of the hand is the baker's best friend, okay?
Seal it with a nice seam and then we can roll it out.
Now, this might have to be done a few times because the dough is a little elastic, see?
I'm trying to get pressure, here and also I'm also trying to stretch a little bit.
Now, it's actually better to do this process a little bit without as much flour.
So, for the next one I'm going to do it without flour, okay?
Because when you do it without flour you get more friction.
The seam is to keep it all even these movements...
Right.
You want to try to get all the air bubbles out.
Okay, so I'm going to let these relax a little because they have a tendency to want to shrink in.
Mm-hmm.
I'm going to do the basic form of the background.
And this would be a normal way to shape a round bread if you had the whole amount and you wanted to make a whole loaf you would shape it like this.
You're really pressing it down.
Yeah, and sealing.
Yeah.
I'm really sealing it.
Don't want to do it too much but because this is kind of a flatter bread I'm going to press this down a little bit.
I'm going for looks here.
Yeah.
But it is still edible.
Yes, it's still edible.
Must be both.
Good to look at and good to eat.
I hope so, I think it will be good.
It smells good.
Mm-hmm.
Now we're going to just let that rest.
Okay?
I'm going to go on to the wheat stalks.
And I'm going to do four.
And this one I'm going to shape again.
We'll have it thinner at one end and thicker at one end.
And put those in flour a little.
Those are done.
These have had a chance to relax.
Going to stretch these out a little bit.
It's important, because if you force them it doesn't do any good, anyway.
They'll tear.
Yes, they will.
You can stretch them a little but you got to be careful.
Yeah, because you could tear it all.
You don't want to tear it.
I like them to be about 25 or 26 inches long because it's going to go around the edge, you know, so...
I'm just going to stretch it a little more and then come back just do it one more time and we'll be ready.
Meanwhile, we're going to commence.
We're going to do a giant breadstick.
So I'm going to take a little bit of flour.
This is my fabricated banneton.
Mm-hmm.
I'm going to liberally coat the bottom.
And then I'm going to start laying my wheat pieces in.
Going to try to leave a space in there.
Oh, and these are the stalks of the wheat, aren't they, yes.
Right, and they're kind of leaning over.
Mm-hmm.
I'll hold this up so we can see what you're doing there.
That's... Yeah, so that's the way we want that.
Mm-hmm.
I'm going to lay that in so it will just cover, okay?
And now I'm going to use plenty of flour because I want these to kind of, you know, not go together.
I want them to kind of stay separate.
Okay, so starting in the middle...
I'm going to just do a simple two-strand braid, okay?
I'm going to flip it over... and keep going with it.
I'm going to kind of open that a little and I'm going to stick that in there.
And then I'm going to take the braid, go all the way around and hopefully, if I measured right we'll end up right at the top.
Yeah.
Okay?
So there it is.
That's very cute in there.
And as my cousin Johnny says "Forget about it."
So we'll let this rise.
How long does that rise?
In this case, a couple of hours.
And then, after a couple of hours-- we just happened to do one earlier-- you know, it's come up halfway.
This is about halfway, but we're going to turn this out now so that the design is revealed.
Yeah, if we leave it in the basket for the whole time the design will just melt into the bread.
Let's see what it looks like.
And there it is.
Okay, there it is.
That came out, because you floured it... That worked out real good.
And you can see... isn't that fascinating?
Yeah, it's got the lines.
Yeah, and the braid shows itself very well.
And now what?
So for another couple of hours, this rises and it relaxes, it widens out and would you like to see what it looks like?
Yes.
Because I've got another one right here.
And after it's done its resting thing it has the chance to really relax.
And what is... you're, what are you pricking it for?
This is just going to help it expand without exploding in a place where I don't want it to expand.
First, I'm going to take a dry brush, okay?
I'm going to take off some of this some of this flour on the background.
Because I want to make a contrast between the background and the... and the wheat sheafs, okay?
And what have we got here?
I got a little egg white and water.
It's about one egg white and about a half a cup of water.
Mm-hmm.
And you're just doing the background now.
It's just the background.
It'll give us a little contrast here.
Okay, so, we're ready to clip it.
Isn't that clever, yes.
And those are cute little scissors, I must say.
I got these in Germany.
These are my little baking traveling scissors.
Yes, I see, as you go down, then it's raising up, yeah.
Well, I never would have dreamt how to do this.
Shall we bake it?
Yep.
Okay, well, I've got the oven set for 400.
I'm going to spray it a little.
How long is it going to take?
It's going to take, hopefully, 50 minutes.
Put a little steam in there first.
For me, I like to get the mist in there-- a real fine mist.
I'm just going to let that hang and then, okay, let's try it.
Leave that open just for a second because the bread doesn't want to get too moist but it wants just enough to expand.
Julia: Now... Joe: We were going to make a couple of small decorations... Well, good.
from some extra dough.
This can either be half of the recipe or part of the recipe.
So we're going to cut this in half.
We're going to make a grape cluster and a little star.
Okay?
So, I'm going to put one aside.
Let's make the grape cluster first.
Start with the archetypal baguette.
It's the beginning of many shapes, right?
Yes.
So I want six grapes and I want one piece for a stem on top.
Now, this is a very simple sculpture.
These want to be somewhat equal and if they're not perfect, that's fine.
That's going to be my stem.
The other nice thing about this is... it shows you how to do a roll.
You know, I'm applying pressure to the heel of my hand.
And you're trying to keep it from running out from in front of your hand with the tips of your fingers.
See that, now... You're using your thumb?
No, you use your... there you go.
And try to apply pressure there.
Is that working?
No.
It takes a little while-- you'll get it.
I can do it flatter, but not... that way.
Okay, see how I'm curling the fingers?
You've got to be willing to put a little pressure on it and use the friction, the wetness of the dough and the dryness of the counter.
That's pretty good.
We're going to go with that.
Got a tray right here.
I'm going to put three.
I'm going to give them a little space to rise, okay?
Okay?
Mm-hmm.
This is my stem.
I'm going to take and cut it like this.
I'm going to put a little flour on here.
I'm going to put this right next to it.
Mm-hmm.
When I'm ready to bake it, I will place it right on there.
If I put it on now, it'll fall through the cracks.
Well, that's this, here.
Yeah.
Yeah.
For the star...
I'm going to make a baguette but I'm going to make it into an epee... which is a sheaf of wheat.
You've seen that before, haven't you?
Oh, yes, mm-hmm-- oh, that's going to be nice.
( in French accent ): I'm going to take my little scissors and I'll go... go at an angle, okay?
Mm-hmm.
I'm going to go all the way through.
...and five.
Okay?
And then I'm going to round this into a little ball.
I'm going to make a little... it's kind of the center of the flower.
Mm-hmm.
I'm going to put it right there.
Yeah.
And that's your egg white again.
Well, I just want to make sure it doesn't dry out on me.
Just want to give it a little bit of moisture.
Mm-hmm.
These are shaped-- we're going to just cover them with a cloth let them rise for about an hour, hour and a half.
And I've got some risen ones over here.
Well, that's nice, so we can see every bit of it.
Have been rising actually a couple of hours.
And that's all kind of fused together.
So they're a little fluffy.
I'm going to do some adjustments.
I'm going to point the tips.
These are all ready for the oven.
Oh, they're ready.
And, uh, I'm going to take my grape stem going to be twisted a little.
Okay?
Now I'm going to do one more quick little glaze because they've dried out a little, you know?
And I want... Glaze helps to give a shine to it, too.
And then just for the, uh, for this one I'm going to do assorted poppy seeds.
Oh.
Sesame.
Mmm, love sesame.
A little caraway.
Caraway, yeah.
And then just a little bit of fennel.
And these are ready to bake.
Because they're a little what I call "over the hill," "overproofed" we're going to put them in a little hotter oven.
That's a little trick for you.
If it's overproofed, hotter oven, so 425.
425.
Oh, those are lovely.
Boy, you have asbestos fingers.
Well, that's, uh, you got to do it quick, you know?
( exclaiming from heat ) I'll get rid of that for you.
Okay, thank you.
When can we eat them?
We have to wait till they cool.
If we tried to cut them now they would be very mushy inside.
And how about this beauty here?
It's still warm.
That's still warm.
It really puffed beautifully.
And I think the way the... all the details this little cutting of the head was beautiful.
That probably should cool for 20 minutes or half an hour at least.
A big loaf like that takes longer to cool.
Thank you, Joe.
Thank you so much.
It's wonderful to be able to make your own yeast and then turn out with something like this.
Well, try it whenever you want.
Oh, we're all going to enjoy it.
( chuckling ) JuliWGBH Educational Foundation] Julia: Bon appétit!