Boom!
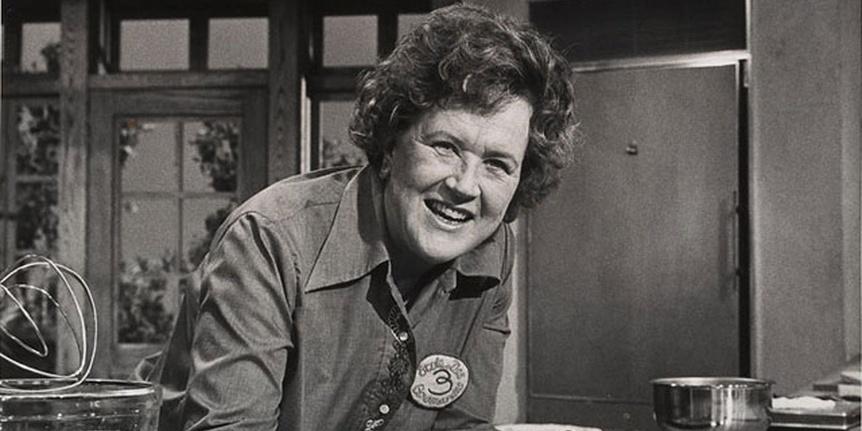
Hello, I'm Julia Child.
Welcome to my house.
What fun we're going to have
baking all kinds of incredible cakes, pies and breads
right here in my own kitchen.
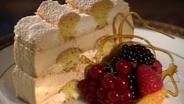
This gorgeous cream cake layered with meringue
is a Viennese specialty.
Pastry chef and master teacher Markus Farbinger
of the Culinary Institute of America
shows us how to do it.
Join us on...
[Captioning sponsored by VIEWERS LIKE YOU]
This beautiful dessert is a classic Viennese pastry
that has been made for decades
and it's made out of layers of meringue.
Here's one of the layers.
That's meringue and then a cake batter there
all baked together
and sandwiched between them is an espresso cream.
And this little decoration, that's a little caramel cage.
We will learn how to make all of these today
from pastry chef Markus Farbinger.
The cardinal is a very traditional dessert from Austria
that is maybe less known, but I think it's very delicious.
So, where are we going to begin?
We are going to begin
by prepping the parchment paper and the sheet pan.
We're going to butter the sheet pan.
That's not so much that things will release
but it's more so that the parchment paper will stick
when we pipe so we don't drag it along.
We fold the parchment paper...
and we cut it in half
and we do that one more time.
So we have strips that are about three inches wide.
That's how wide our strips are going to be at the end.
You can see that it sticks nicely with the butter.
We put three strips on the sheet pan
a little bit away from the edge
so in case we go over
it doesn't stick to the edge.
The next thing is the meringue.
And for that we are going to take four eggs
and we put the whites in here.
If you're not very well versed with cracking eggs
and separating eggs
separate them one at a time into small bowls.
Which is very sensible anyway, I think.
Yes, so in case you lose a yolk
you don't have to...
And you don't want to have
any yolks at all in the whites, do you?
It's very important, yes.
The bowl has to be very clean.
You have to wash it out with hot water
maybe a little bit of vinegar
and then rinse it with cold water
and making sure, of course
that it's free of any particles or any fats.
So we have our four egg whites.
We add the six tablespoons of sugar
and we take the whisk with our hands
and just stir it up a little bit...
Mm-hmm.
to ensure that the sugar
doesn't go all the way to the bottom.
Mm-hmm, that's a good idea.
So it will whip up properly.
Very important always that we start
the egg whites and the sugar
on medium speed first.
This way the egg whites loosen up a little bit
and then we get a nice light foam.
And then after a few minutes we turn it on high speed
because we want to get it done.
So with a meringue
it is very important that... that it's stiff
especially if you fold in another ingredient.
So, a stiff meringue, as you can see.
You make the peak
and it stands up straight without curling over.
That's really thick, yes.
So it's quite important.
Then we fold in more sugar.
This is a three-quarter cup of powdered sugar
and we sift in about half
fold that in and then we sift in the rest.
Mm-hmm.
And with a rubber spatula...
A nice big one.
fold it in very gentle.
That is wonderfully stiff.
It's always important, dry ingredients, to sift them
very close to the time you fold them in
because the moisture and so on
lumps it up quite a bit.
Fold in the rest.
A nice motion going all the way
through the center bottom of the bowl
and bringing it up.
Okay, good.
Just get it good and stiff that way.
Yes, it is very important
that the meringue should still, you know, have
some nice stiffness to it.
In order to shape it, we have a piping bag.
Any bag can really be used for that.
I just like to use the plastic
because you can see through.
I've not seen these plastic bags.
They're new now.
And in the industry
they're used for sanitation reasons
because, naturally, if the bag is not cleaned out
it's better to just throw it out
especially for very sensitive...
For egg things, too.
For egg things and for chocolate things.
Now, holding a piping bag--
there's a little trick that I would like to show.
You use your thumb and your index
and kind of hold the bag open as wide as possible.
Oh, yes, yes.
With the middle finger, you secure the bag
so it can't fall off.
With the small finger
you hold, kind of, your tip
so when the bag is a little loose...
Oh, that's a good idea.
it doesn't run through.
And you can hold it open for me.
All right, I will.
And I put the batter inside.
Always use small portions.
That's a very sensible way of...
The bowl, we don't worry too much about.
We use it for the next batter.
We don't have to clean it, so another step less.
Again, then you fold up
the end that was flipped over
and we close it up like that.
And I always say, like milking cows we close it
but I guess mostly people don't know
what that is, milking cows.
Okay, so we start on the left
and kind of try to move with the entire body
leaving the arms very loose.
So there.
Bottom part.
You're getting it off nicely.
And then the center.
You place the tip down and you start pressure.
If you move fast, the strip is thinner.
If you move slow, the strip is thicker.
So kind of the perfect combination
between movement and pressure.
And then at the end, you kind of stop the pressure
and pull it away to the other side
so you don't have a big worm sticking out there.
And we just use that leftover batter
for our next layer, our sponge layer...
Uh-huh.
and whip it up so we have no leftovers.
Good.
And you can use the bag again for your next layer.
Okay, for the next layer
we're using the four yolks from our meringue...
Mm-hmm.
and we crack four more eggs.
With the four egg yolks, the four whole eggs
we have also 4½½ tablespoons of sugar.
Mm-hmm.
And, again, we just stir it up
to ensure that the sugar is properly mixed in.
And, again, we put the eggs in
for a few minutes on medium speed
again, to loosen them up
so that they incorporate air properly.
And then we turn it on high speed
and with the whole eggs at the end
we slow it down one more time for two minutes.
And you want that to be sort of foamy.
Yes, very foamy and stable.
We will see that later on.
It's kind of very thick and full.
And then we fold in three-quarter cups of flour.
All-purpose is fine.
You can use cake flour.
Well, this is really a genoise batter, isn't it?
Yes, it is.
It's a very light one, relatively low in sugar.
And there's no butter in it.
No butter.
And we fold it in
again, all the way down through the center.
It's very important.
Down the side, coming back up on the other side
and through the center.
Yeah.
Now, this is a little bit more fragile
so we have to be... almost cut out the batter
rather than, you know, scrape it out.
So really gentle.
Don't spread it, just cut it out.
You don't want to deflate it.
Yes, very important
because the more you deflate it
the harder the product is going to be at the end
and it's going to be very gritty
rather than nice and light and nice to eat.
Very important now
we really have to squeeze that batter inside.
And I'm sure you can see
that batter is actually ahead of the tip.
That will tell me that all the crevice is filled.
And you really kind of hold it very low.
That's very important.
If we don't really squeeze it inside
those layers will fall apart afterwards.
Uh-huh.
For the baking, that's a very important step.
We bake this at 300 degrees and 40 minutes
and that we have to put in a wooden spoon
to keep the door ajar
so that any steam that may come from the baking
can escape.
What the steam would do is
it would make the product rise quickly
but then it would deflate.
Fine.
And now the chef is going to make a caramel.
That's certainly one of the most important things to know
for pastry baking, isn't it?
It is a very important product.
We can go right into it.
Very important for the caramel
is that we have a pan that's wide enough
and medium heat at the beginning.
That's very important.
If the pan is heated up too quickly
the sugar will caramelize unevenly
and may burn on some parts.
So we use a very unusual method.
What we do is preheat the pan...
I've never seen that.
on medium.
And then we just sprinkle the sugar on the pan
and now we wait for the sugar to just melt.
Immediately after it's melting
we sprinkle some more sugar on top of it
and we can see nicely
how the sugar is melting nice and light.
Mm-hmm, yeah.
It is always the pride of any pastry chef
to make the caramel as light as possible.
So we just continue sprinkling in the sugar
where it's molten.
It kind of cools off the sugar that way and it doesn't burn.
And we do that about with half the sugar
and then we start to use a wooden spoon
and we can see that the sugar is very molten
and we just stir it in there.
And the sugar is all molten.
There're no lumps in there.
So now we add in our sugar in small stages
a tablespoon at a time, approximately.
And we only add as much as the molten sugar will take.
If there's more dry than molten
that's when you may get lumps.
So just be patient and...
Do it carefully.
Do it carefully
and you don't have to do it again.
Okay, so the caramel is now ready.
One can see the smoke a little bit.
It's time to shock it, very carefully, very slow.
( steam hisses )
Nice and easy.
Just stop the cooking process.
Mm-hmm.
Okay.
And now we just stir it very gently
to turn it into a thick honey consistency
so it runs off like...
Mm-hmm.
like honey.
We let the sugar just rest for a moment
and we prepare those cones.
Again, parchment paper
and with caramel, it's good to oil it.
One also can use oiled aluminum foil.
What kind of oil?
Regular.
Vegetable oil?
Yes.
You can be generous
because it's better a little bit too much
than not enough.
And we cut them in four- by four-inch square.
Just approximately.
And then we kind of fold this in half
and one more time in half
just so we know where the middle is
and then we make little hats out of that
folding over approximately a quarter
so that this line and this line kind of match up.
So this way we also make sure
we have the same size on all of them.
Okay, and we can staple them...
Put them together.
just so they don't come apart.
Well, that's interesting.
And we make six... six hats like that.
Mm-hmm.
Now, we have a few prepared.
Mmm-hmm.
Okay, let it drizzle on the main part first
so it's the thickness you like
and then just bring it out here
and do your best to aim.
Just drizzling on here.
A little thicker on the tip
because that's where all the support is.
And, of course, when the sugar's in the right consistency
you really can guide it nicely.
Would you like to try some?
Mmm-hmm.
Still a little thick.
Okay.
Good... wonderful.
That's fun, isn't it?
Just pick it up.
It's almost easier to remove it quickly
while they're still a little warm
because the caramel is not that brittle yet.
There, that's cute.
Very nice.
Then we just keep them until we're ready to use them.
Yep.
Put the sugar back.
And with that same sugar
we are going to make our couleur--
which means "color" in French.
But really it is an espresso extract we are making.
It also can be made well ahead of time.
That's still very hot.
You were saying...
What if you burn yourself with caramel
what are you supposed to do?
Yes, it's very important.
If it splatters--
splatters on you or anything...
a mistake happens, whatever--
then you right away put your hand
or the thing it splattered on in ice water
and keep it there for a minute or two.
And it will save you from getting...
That's why you always have ice water nearby.
It's a good thing to have.
At least at the beginning...
A good thing to remember.
Yes, until you feel more sure about it...
But even so, it's probably...
You never know what's going to happen.
I like to do it always
because it doesn't cost much to make a quick ice bath
and a burn would be very severe.
So, our caramel now turns dark.
And for that I cut a small white cardboard.
It's very important that we have a white cardboard like this.
You can't see it on parchment paper
because it's not white enough.
And we make a little drizzle on here
and we see the color.
It's really quite dark.
And if you make the thing...
The differences are already big.
Yes.
And you want to get it darker and darker?
Very dark.
It's going to smoke, as you can see.
Yeah, it is.
And this is how
you're going to make you color.
Yes, the couleur.
It's called "color," but it's really a flavoring.
And certainly also, the caramel makes sure
that the color of the butter cream will be nice.
While if you just put coffee in the cream
it kind of grays.
It's not very appetizing.
There's that smoke coming out.
Yes, and the sugar at this point
is pretty much so hot
and I don't have the scientific explanation for that
but the sugar is so hot
it starts to cook by itself.
And when those bubbles come
that's when you can turn off the heat
and it will just continue cooking by itself.
Okay, and that goes now very rapid
and we have to be very careful.
We get our espresso ready.
And it's good if it's hot
because it will splash a little less.
The temperature difference won't be so big.
I think we take it out now.
Almost has the color of the espresso.
Mmm, yes.
I think we're ready to go.
So at this point
it's very important that the heat is off
because we have enough heat as it is.
We've gone way way.
Yes.
We add just a little bit.
( sizzling )
Very patient-- one has to be patient.
And you just stir it in very slowly.
If you don't have an espresso machine
just double your amount of coffee.
Yeah, mm-hmm.
This way you can also adjust
the strength of your coffee extract
that you're making.
And don't add it too quickly.
If you add it too quickly
then the liquid will seize up the sugar--
it will cool it off so much that you have lumps.
So, we can add the rest.
Okay.
We bring that now to one more boil.
Make sure that all the sugar is dissolved--
all the caramel is dissolved.
Get down the sides.
Yeah.
We can use a...
Preserving jar.
Yeah, or bottle does the same thing
with a cork on the top.
Heat-proof, I guess.
And then we try to pour that in here
and close it up.
And this makes a great flavoring
for a milkshake-- coffee milkshakes
and butter cream.
You're going to do whipped cream now?
We're going to make
our cream for the cardinale with that.
How long will it last now?
About six weeks at room temperature.
That's fascinating.
I never heard of that before.
Now... what?
We finish it.
Finish it?
Assemble it?
We have a pint of heavy cream
and about two tablespoons of sugar
that we whip.
And you can whip it the night before.
But make sure it's soft-peak.
And the next day, if you finish whipping it
it will be a little bit more stable.
So it's easier to handle.
And the cardinale...
Keep it in the fridge?
Yes, you keep it in the fridge
and the cardinale will then be
a little bit more stable.
For the flavor we add now the couleur
which, of course, must be cooled.
And, again, approximately two tablespoons.
And that really is kind of a syrup.
It is very syrupy.
If you like it stronger, then...
You can put in more.
You can add a little bit more.
That's sort of a light café au lait color.
Yes, it's a nice color.
And you finish blending it with a rubber spatula
because it goes all along the glass
while the whisk only...
That's a lovely color, really.
Yes.
Like so.
That was easy enough.
And we cut a cardboard--
just a regular cardboard-- into a nice square.
Even if it's a little short, that's fine.
It's just so it's easier to lift it around
when you put it in the refrigerator.
It's so pretty--
that's the one we made, too.
And we pick the best one.
Which one do you think
we should pick for the top?
That one's pretty nice.
So, we peel off the paper-- gentle, though.
It's quite fragile.
It's very crispy at this point.
And the nice part is
once you've filled them, about an hour later
the surfaces get a little soft
from the moisture in the cream.
So, we take about half of that cream
and, uh, just, uh... place it onto the first strip.
Small palette knife-- spreading, very gentle.
Not too much spreading is necessary-- just roughly.
So, we just place it on, and gently we...
That's very gentle.
Fasten it.
And we get the last.
Again, we kind of just...
It looks so good.
Mmm.
We place the last one on top.
Just... spackle the sides.
So, if you do home improvement
you're good at that.
Do this one more time.
I think that's it.
Mm-hmm.
Corners.
Good.
Now it's important
that we chill it approximately an hour
or we put it in the freezer
for about ten, 15 minutes.
Oh, the freezer?
You can put it the freezer.
If you need it very quickly
you put it in the freezer to speed it up
and even if it's a little bit frozen on the outside
that's just fine.
It will help and aid you when cutting the cake.
Okay.
Now, how long has that been in the fridge?
At least an hour I would say.
It should chill down well.
But, uh, now the cutting part.
It's something everybody's scared of.
And there are a few tricks to that.
First of all, a serrated knife and hot water.
The hot water will cut nicely through the cream--
it won't stick to it too much.
If you're right-handed, you cut from the right side
so you can support with the left.
If you're left-handed, you'd cut it like...
Yes, well, that's a good point.
I never would have thought of that.
And another trick for that is--
and this would be a good trick
for almost all items that are creased on the top--
you just cut the first layer.
Oh.
Very gentle, only with three fingers
and the weight of the knife is cutting it.
So, just cut the first layer.
That guides you.
Yeah, it guides
and also it won't kind of squish the layers down.
So you have the first cut already.
And this is also a nice and helpful tool
so you can cut straight.
As well as it supports it.
So you cut very gently in a sawing motion--
not too much pressure.
You can cut down.
You can slide over... and the next one.
Very gently.
Mmm.
And, after each cut
one should clean the knife again
because that cream would get caught on the top
and it wouldn't look very good.
I'm going to powder-sugar it just a little bit--
just a tad.
So you still can see the colors underneath.
Look at that, mmm...
Isn't that lovely?
Now, a little...
That's such fun, isn't it?
A little fruit-- just to finish it off.
Very nice.
A few... red currants if they're in season.
That's lovely.
Are we going to eat it?
I hope so.
Show us how you do it.
How I do it...
If a dessert is quite tall in general
it's good to bend it over.
You should probably be served
a fork and a spoon, shouldn't you?
Absolutely, yes.
It's very crunchy.
And that becomes a little softer
as it stays in the refrigerator.
Mm-hmm.
Mmm...
It's important to get everything, the meringue on the...
It's my father's favorite dessert.
Is it?
No wonder.
Markus, a great experience.
And you've taught us so many
good, little tricks about how to do this.
I'm glad.
Thank you very much.
Great.
Julia's got the tastiest site on the
Julia: Bon appétit!