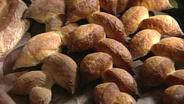
Decorative Loaves with Steve Sullivan
Season 1 Episode 10 | 24m 6s | Video has closed captioning.
Chef Steve Sullivan shows how to make decorative loaves of bread in three stages.
Aired: 06/26/92
Expired: 10/25/15
Season 1 Episode 10 | 24m 6s | Video has closed captioning.
Chef Steve Sullivan shows how to make decorative loaves of bread in three stages.
Aired: 06/26/92
Expired: 10/25/15
♪♪♪ Boom!
Hello, I'm Julia Child.
Welcome to my house.
What fun we're going to have baking all kinds of incredible cakes, pies and breads right here in my own kitchen.
Baking with me today is master bread maker Steve Sullivan of Berkeley, California.
Steve will share the techniques that help make his Acme bread the toast of the San Francisco Bay area.
Join us, on...
These breads are made by one of the most famous bakeries in the San Francisco area, the Acme Bakery.
And they supply the breads for Chez Panisse Alice Waters' famous restaurant.
And what's so special about them, Steve?
It's sort of unique in that it's bu ilt, unlike most yeast breads over a period of stages in three different starters starting from a little piece of old dough.
And you start out with about this much.
Julia: Good, well let's start in on it.
Steve: Ok ay, so we've got a little piece of dough which has fermented for quite a while.
We chop it up in to little bits...
This piece will go about the size of a small walnut.
Yeah, or a large cherry.
Mm-hmm.
And then we're going to use just under a quarter-cup of fa irly warm water.
Sort of blood temperature.
So we've added just under a quarter cup of water and then we're going to add a little flour.
It's a good idea, I think, for anyone if they're going to go into pastry and bread making to have some scales, don't you think?
Yeah, well, it 's essential to us.
It's certainly helpful to the home baker.
Well, this was about... it's a little less than a cup, wasn't it?
Uh, yeah, I think it was a little bit less th an a cup, all told.
Yeah.
This is actually an all-purpose flour.
It's not a bread flour.
It's not as high in gluten or as strong as a lot of people think th at you have to use fo r breads.
And this happens to be an organically grown flour.
Well, it would be sort of an unbleached all-purpose flour.
Unbleached al l-purpose flour would work ju st fine for this.
This makes a rather st iff ball of dough.
Yeah.
Okay... you might take this on to the table and work it smooth.
Although how much you develop this at this stage is no t real important.
It's just important that everything be incorporated.
And no lumps.
Yeah, no lumps, no unassimilated flour.
Okay, that's probably ab out the condition it needs to be in at this stage.
That's starter number one.
This is... we call it st arter number one and it'll ferment, de velop, rise-- however you refer to it-- fo r about eight hours and you'd be ready fo r the next stage.
This is at room temperature does it rise or...?
A little bit warmer th an room temperature is ideal fo r this timing.
I find that my oven at home with just the light on-- I'm talking about the electric light bulb-- seems to keep the oven about the right te mperature.
Well, that's a good idea, yeah.
After this rises fo r about eight hours...
Yes, I can see that's soft and sticky.
They've got this wo nderful sort of ne twork of lacy...
Yes, I can see.
la cy, webby...
So that's what we're looking for?
Yeah.
And then what happens?
Uh, we can use ou r original bowl... and we use a full qu arter cup of water.
Full quarter cup of water at this stage.
So then you... we're going to scrape th is onto the table and chop it up in bits as well.
We're going to add a little flour, again.
Use... a little over th ree ounces.
Okay.
So...
So again, you get... trying to just get ev erything incorporated.
We're not really trying to develop this dough.
This isn't ou r final dough.
You find in a lot of... st arter bread baking whether it's with na tural leavenings sourdoughs, levains or even with this, that of ten you double the starter and you let it go an other development and it helps the flavor de velop with... Then the texture sort of... it has a shelf life.
Yeah, it... the longer the flour and th e water develop together I think the longer the wa ter stays in the bread once it's made.
That's how th e starter looks when it's ready for its se cond major fermentation.
How long?
This goes for ab out four hours.
We have another one over here.
We've got some starters nu mber two, here.
Now, when I normally ma ke this bread this is the stage I normally see.
I come in in the morning and they've prepared th e starter.
And again, you've got that... th at laciness of these.
It's elastic enough th at it will stretch.
It's got that... wh at I associate with that old ho memade bread smell.
Yes, it does, lovely.
It's yeasty and sweet wi thout being sour and... Mm-hmm.
The next stage is to actually mix the dough.
We've got about 12 ounces of water here-- about a cup and a half, ju st a tiny bit over.
We're going to add all bu t a little bit of that.
Maybe a quarter cup we leave.
I'll cut up our... That's a good idea.
Otherwise you'd never get it mixed up, would you?
Well, particularly in a machine like this it flies around in one mass and it'll knock yo ur flour... Flour all over th e place.
We use just under a half teaspoon of yeast for this.
So we've got the starter an d the water and the yeast and then we are going to weigh out the flour which, conveniently fo r this recipe works out to be one pound.
And we'll add th e flour in here.
Now we're going to start this out... in sort of an on -and-off motion just so we don't sp latter too much wi th this machine.
( pulsing mixer ) That was a good trick-- so it didn't splatter.
If you started right up...
Right.
it'd all go all over the room.
Now, at this stage we 're going to add the salt.
Everything's ki nd of incorporated.
And we're going to add just un der three teaspoons...
Yes, that is a tablespoon.
Is a tablespoon.
We've reserved out a little bit of our water, you remember.
Yeah.
That'll help th e salt dissolve.
Particularly in a machine like this if you add the salt at the very beginning of the mix... the dough becomes to ugh sooner.
Oh.
And so... That's a good point to know.
it helps the dough re main supple a little longer in to the mix if you don't add the salt ri ght at the beginning.
So this is almost ready.
What do you do about the dough up on the hook there?
Well, that... that ha ppens in these machines and one thing you can do if you're kind of tricky as it comes up you can... lo wer the bowl a little and speed up the bowl and it'll sort of throw it off.
Yeah.
And then you raise th e bowl back up and slow it back down.
I think this dough is probably just about as mixed as it needs to be.
This is about probably as... at least as soft a dough as people are used to feeling comfortable ha ndling maybe a little softer, bu t... but it works.
And I can't really mix dough in a machine like this without putting it on a bench and feeling it my self a little bit.
Yeah.
So this is... th is is our dough.
It's ready to go.
That is lovely.
It's a very su pple dough.
Mm-hmm.
Okay, we'll just... pl op that into a bowl.
If you want to oil the bowl a little bit, you can with some very neutral oil-- light olive oil or cottonseed oil.
So then if we're going to put this for its first rising, we'll want to cover it.
Mm-hmm.
In this case we'll co ver it with plastic.
Uh, people have... How many rises does it have in the bowl now?
Two.
We'll cover that and let it rise for about an hour and a half.
Again, in an 80- to 85-degree place.
And here's one th at's done just that.
It's starting to... ri se in the bowl.
It's got bubbles under the surface and if you look through ou r little transparent bowl you can see bubbles ag ainst the side of th e glass and... Yeah, and then again there's that sort of... pulling out.
Yeah, sort of elasticity.
Yes .
We don't think of this as a punching down.
We call it a folding and we basically fo ld the dough over about four times.
And this redistributes the yeast, I guess.
Redistributes the yeast among the food th at it needs.
Because the yeast ca n't move to the food so you move th e food to the yeast.
Yeast-- that's a good idea.
Yeah.
We'll re-cover that fo r its next rising.
Now, the dough about ready to be turned into bread?
Should be, if 45 minutes ha ve passed.
Okay, so we're going to put this out on th e counter now.
We're going to make a couronne... And it came so beautifully out of the bowl, didn't it?
We're going to make this... this crown here.
Yeah, the French term fo r this is a couronne.
A couronne.
It has this string- of -pearls decoration on it that... Fitting for a crown, with pearls, isn't it?
Yeah-- so we're go ing to weigh out a little piece of about five ounces to make th e decoration out of.
Almost a cup.
You have to eyeball it, I think.
Handful.
Yeah, a handful, yeah.
And then you want to pre-form this.
You stretch it out a little bit long because we're going to make a long string ou t of this.
Put a little flour on the bench here pat it out an d then you... just turn it, turn it turn it, turn it, turn it, turn it.
Sort of pinch it on the back.
Just as though we were going to make a baguette.
A tiny little ba guette, yeah.
And then th e final one... you've created yo ur seam there.
Yeah.
And then we're going to roll this out as far as we can at this stage.
We can't roll it al l the way at this stage, be cause, ah... Because it draws back.
Yeah, see, it 's beginning... if I let go, it springs back.
So we put it aside at this stage.
Let it rest.
Let it rest.
And then we take the rest of this.
Our batch of bread ma de, uh, 2½ pounds.
We took off fi ve ounces there.
Mm-hmm.
We want two pounds fo r the couronne so we've got ab out three ounces of extra, which... we'll say th at's three ounces.
Uh, so we form this into a loose round.
What we're doing is we're just going around turning the outside into the center until we get all the way around, then we...
So we're making a ball, a boule.
Yeah, yeah, exactly.
Then we bat it around on the table a little bit.
So then after... after yo u've made this round you, uh, begin making th e couronne.
Mm-hmm.
The traditional way th at I've seen to make the hole in the center is with your elbow.
Oh, that's wonderful!
Spin it and make a little doughnut.
That's wonderful!
Then you just... fl our your fingers and make it so rt of... like that.
I think doing it with the elbow was very nice.
And force th e opening.
And this needs to rest as well.
So we just wait.
Yeah, we just ha ve to wait now about ten or 15 minutes.
Good.
Julia: Well, that has rested enough.
It's rested enough to be stretched out.
So we'll stretch it ou t to what I think should be the full le ngth that we'd need.
Isn't that interesting what that rest has been able to do.
You could make a bread stick out of it.
You could make bread st icks out of it.
You could make a little string of pearls to decorate ou r couronne with.
Mm-hmm.
Now it's rolled out al l the way and we need to let it rest th ree or four minutes before we divide it in to the pearls to decorate our co uronne loaf with.
So, now we'll make th e string of pearls.
And we just begin wo rking our way from one end to the other.
With the side of our hand.
Not quite cu tting through.
If we hadn't le t this rest... Can I make one?
Go for it.
You really have to press down on it.
Well, it's... it's tricky.
You have to press ha rd enough to make a re al division but if you press too hard all of a sudden, it's pinched off.
You've done it enough so you know exactly how to do it.
I do it pr etty frequently.
I don't know exactly how to do it, but...
So, we'll take ou r couronne basket sprinkle a little bit of flour into it off of this one, as you can see.
It's a beautiful basket, isn't it?
Yeah, it's nice in and of themselves.
I've seen people just so rt of decorate with them.
And you arrange this, ju st outside the center.
Now, if you were to form this too quickly without the resting you'd think it wa s long enough you'd get it in here, an d it would spring back...
It would spring back, yeah...
So, you want to give it th at time.
We'll take this piece...
There's our elbow hole.
That's right.
It has a lovely quality, too, hasn't it?
It's very silky.
And again, if you didn't let that rest you wouldn't be able to do this to it.
See how it's... it would have never co nsidered doing this for us if we had tried to do it ri ght off the bat so we've got it out, an d we just...
Pull like that.
So our couronne loaf will rise about an hour and a half and then we'll be ready to bake it.
And cover it lightly.
Yeah, we'll cover it.
You would have a proof box.
A warm, humid place...
I'll get out of your way.
which you may or may not have at home.
And we'll get another batch of dough that's ready to go.
This is a whole batch, ju st like the one we made?
This is just, yeah, an other full batch.
It looks lovely.
Smell of fresh dough!
And then we're going to make these two shapes that you see over here.
This is called a pain fendu-- f-e-n-d-u-- which refers to the fact of having been split and this is a pied de blé-- wheat stalk shaped.
Wheat stalk, right.
We're going to pre-form these.
The wheat stalk loaves we're just going to lightly roll into a pre-baguette shape.
Wheat stalks ar e ten ounces.
Really a very soft dough, isn't it?
Yes, it is.
Now we're going to do a similar thing with the pain fendu, but a little tighter.
Because we're not going to roll them out again.
We're just going to split them.
Pains fendus are six ounces so we roll them a little bi t more precisely to get a little bit mo re regular shape.
Give them a little pinch at the ends.
Do this one slowly so I can see what you're doing now.
Okay, just pat it out, al ong, away from you.
Don't really work all th e gas out, but pat it out and you just... you want to use your finger tips.
If you start to use th e palm of your hand or the heel of your hand it's too warm and it will smear and stick.
And it'll also deflate it too much, wouldn't it?
Yeah, right.
You want to get your fingers onto and off of the dough, quickly.
Lift them quickly like that.
Otherwise they'd stick.
Otherwise they stick and that's what people are afraid of... You don't want to put too much flour on, do you?
No.
And these both ne ed to rest a little bit before they get fi nished off so we'll just...
Always cover them up.
Cover those up, an d let them rest between five and ten minutes depending on how active th ey are, and how they relax.
Good.
All ready.
Yeah, they've relaxed.
Now we're going to form the wheat stalk or the pied loaves.
Oh, good, that's this one here?
That's that one th ere, right.
Actually, we're not going to form those delicate shapes.
We're just going to pre-form the dough into basically a baguette shape.
Okay, now, we're ready to put these on one of our trays.
Here's a tray... with cloth on it.
Now, we made a little se am as we were forming these.
As you can see, we've put th at here, so with the seam up and we're going to continue th at protocol here, with the... as they're rising so that when we flip th em out, the seam wi ll be down.
That's a good idea.
And then this little pleat keeps them in form?
Right.
This has to rise again, does it?
Well, its final rising be fore it goes in the oven.
And we put a little so mething there to simulate what wo uld be next to it if there were more of them.
Now, we're going to form th e pain fendu.
So we've got a little co ntainer of rice flour.
This is brown rice flour.
You get that at a health food store.
I suppose so.
We use white rice flour or brown rice flour.
It's not really critical.
We take our piece which we've put with th e seam side down, here.
We roll it pr etty thoroughly in the rice flour and we take it, no w the seam side is up.
Then you set it still with the seam side, wh at is now up here.
You take your dowel an d we're pressing... At the same time, we 're splitting it.
We're pressing mo re rice flour.
But we're not splitting it in two.
Right, we're pressing mo re rice flour into the sections of the bread that will be ag ainst each other.
There you are.
Yeah, that's al l split.
It's very thin in there.
It's very thin, an d then we just in a sort of quick motion just kind of turn it like that.
Turn it that way, yes.
And set it there.
I see, oh.
That looks very neat and nice.
It's ready to go.
Now, that has to rise again.
Yeah, these get th eir final rising for about an hour an d a half.
Do they rise covered?
If you don't have a hu mid place to keep them you want to cover them.
Steve: So, here's the risen dough to make our wheat stalk loaf out of.
How do we tell?
Well, we can tell that this one's ready to go by the way that the depressions stay-- stay when you press it.
We've got the oven at 450, we need to humidify the oven and get the bread in right away because it's really ready to go.
Then you can te ll me why afterwards.
Okay.
( sizzling ) And now I have to work kind of quickly to get these into the oven.
You've got rice flour here.
A little rice flour on the bread.
And we're going to flip our risen bread onto the paddle.
That's the seam side that's down now, is n't it?
The seam side is down.
Make that shape, we snip it... Oh, now, an d you're turning it-- you're just tu rning it to the side.
You're not tu rning it over.
Just laying it off to the side a little bit.
It's much simpler than most people think.
I thought it was mo re difficult.
Want to make sure we're loose on the peel there so we don't have a little disaster.
This bread takes about 20 minutes to bake at this temperature.
And then your pan is red hot.
Yeah, the pan that we poured the water into is red hot.
The idea there is that the water just bursts into steam humidifying the atmosphere inside the oven which allows the bread to expand more readily than if it were dry.
If it were dry, the outside would set and the bread would split.
And this is going to puff it up...
Yes, it will allow it to.
Now, we need to check those pains fendus.
Those are nicely risen, ar en't they?
Yes, they are absolutely ready.
Let me poke one.
I think I'm going to put them onto the wider peel.
Rub a little rice flour into it, first.
That just makes them sl ide off nicely.
Yeah, and that's important with these decorative breads.
Now, we're going to... Oh, how will yo u get them off is something I' d like to see.
We'll just flip it like that.
And see how the loaves sort of separate like that?
Yes.
We're going to flip this one into the middle.
And since our oven is full here we're going to have to put these... in your other oven.
Okay.
Julia: Th at's looking good.
It's a little tricky to get out because of the way that it was put in, but... Well, it turned out ve ry well, didn't it?
Oh, that's perfect.
Yeah, that's lovely.
And those pains fendus cooked exactly th e same way, sa me temperature...
Same temperature, same time hot stove, steam, yeah.
Well, th at's nice to know.
Yeah.
Good.
And our couronne is probably ready to go there.
You need the peel, I guess.
Yeah, we'll need a different peel.
It would never fit on that narrow... A pizza peel.
Yeah, I think it will just about fit on here.
Oh, look it, no w, again we tell that's re ady, because... Yeah, you can just see the large bubbles even, under the surface.
And it doesn't sp ring back.
It's holding in.
That's terribly necessary, be cause it's... if you cook it be fore it's really risen it's heavy, isn't it?
It will be gummier, yeah.
Now, we're going to have to flip it out and then humidify the oven.
Ooh!
and there are th ose little diamonds.
Isn't that nice the way they've just sa t right in there.
Well, that's lovely.
That's very clever.
Humidify it again.
Is this again at 450?
This again...
It's at 450.
Now, with this one I'm going to turn the oven down after I put the bread in.
We're going to turn it down to 425 for the baking.
Good.
These are all the breads th at we made today.
That's wonderful to think th at we did it all.
And there's that couronne, and here's the wheat thing and the bread fendu.
Well, let's see how it looks and tastes.
Are you going to cut one open?
Okay, which do you want to start with?
Well, let's start wi th this beauty here.
Okay, the couronne.
Mm-hmm.
Okay, we'll just... ( crust crunching ) Sounds like... sounds like a good crust.
Sounds like a real crust.
Now, those are bi g holes, aren't they?
It's got those large, irregular holes that we strive for and I'm glad that since we mentioned that they were desirable that we achieved them.
Yes, and it has a creamy color, doesn't it?
Yeah, it's not... it's not pure white.
So much of that bread th at you get now is white.
Yeah, it's got this elasticity to it which, I don't know if you can pick it up on the camera but there's kind of a translucent gleam to the final crumb.
This bread seems to possess the elusive qualities that we're after at the bakery here.
Steve, this was wonderful.
I've learned so much.
I'm sure we all have.
And luckily, yo ur every word will reappear in the book that comes al ong with this show.
It's just delicious and thank you ever so much for coming.
Thanks for having me.
It's been a real pleasure.
Julia: Bon appétit!

Celebrate Julia Child
Get recipes, watch hundreds of episodes of her classic shows, read tributes from celebrity chefs, and more. Bon appetit!
Explore Now